Explore the knowledge base through the menu on the left.
Search for answers by refining the results through the drop-down categories.
-
General FAQ
-
ZowieBoxPro
-
- How to supply power for ZowieBox Pro
- How to use touch screen of ZowieBox Pro
- Does ZowieBox Pro support PoE?
- How to connect your Zowietek device via ZowieX
- How to Connect ZowieBox with Your Devices?
- What is the login account and password
- How to set the IP address for ZowieBox Pro
- If I didn't have LAN, how can I visit ZowieBox Pro?
- How to reset ZowieBox Pro to Factory Default
- Will settings be saved after power loss?
- How to manually update firmware for ZowieBox Pro
- How to upgrade firmware with USB
- How to switch USB between Host / Device mode
- How to switch Encoder / Decoder mode
- How to connect with Nintendo Switch?
- How to connect with PS5/4?
- How to connect with X-Box Series?
- How to switch HDMI loop out and output
- How to use DC Out port to power accessories
- How to connect and control PTZ Camera
- How to use X-Box controller to control PTZ Camera
- How to use NAS to save video files
- ZowieBox Pro Firmware Release Notes
- Show all articles ( 8 ) Show all articles
-
- Recommendations for storage device speed
- Does ZowieBox support OSD?
- Can ZowieBox switch to a still image? Like jpeg that says be right back?
- What USB dongles does ZowieBox support?
- No Ethernet Port on Laptop, how to extend ethernet to use NDI?
- How to improve device temperature and fan sound
- Whether Zowietek Products Support Decimal Resolution Input, Encoding, and Recording
- How to set up PC display adapter settings when ZowieBox identifies the computer signal source as having an incorrect or unsupported resolution
- How to use USB MIC
- If 3.5mm line in audio pass through HDMI output?
- Video file can not be viewed online
- How to check recorder status?
- UVC input compatibility inquiry
- Does ZowieBox Pro's UVC out support Mac?
- How to use the UVC function of DJI
- How to use the UVC to HDMI function
- How to use UVC to NDI function
- How to use ZowieBox Pro connect to Zoom
- Differences between ZowieBox Pro and ZowieBox
- How to recover ZowieBox if it works abnormally after the upgrade
- How to use ZowieAPI with Bitfocus Campanion and Stream Deck for scheduled recording
- What is the Difference Between ZowieBox Pro and ZowieBox?
- what is WiFi6 for?
- How to control a UVC camera by PTZ Controller and ZowieBox
- Show all articles ( 9 ) Show all articles
-
- How to set encoding bitrate
- How to configure SRT Caller Listener Rendezvous Mode
- How to configure SRT related parameters
- How to use SRTMiniServer for streaming
- How to stream to OBS by SRT
- How to decode/encode SRT to ZowieBox Pro using vMix
- How to get RTSP streaming URL
- Does ZowieBox Pro support saving video files to local disk?
- Can I record and encode at the same time?
- How to use video recording function
- What video formats does recording support?
- How to stream to YouTube
- How to stream to Facebook
- How to stream to Twitch
- How to stream to Wowza
- Can I stream to multiple platforms at once?
- Can store multiple streaming keys for YouTube?
- Suggestions for audio asynchrony when streaming to YouTube
- How to use OSD text / timestamp / image overlay
- How to use OSD scoreboards
- How to use AI Tracking function
- How to use Chroma Key green screen
- How to set multi-device NTP time sync
- How to use pure audio only mode
- How to use multi-channel audio?
- Zero-latency HDMI loopout usage for game console
- What is the latency of 4K60 encoding & transmission?
- Bitrates corresponding to different resolutions in NDI encoding mode
- How to perform point-to-point P2P video transmit over LAN
- How to perform point-to-point P2P video transmit over Internet
- How to use AVoIP to NDI encoding function
- Show all articles ( 16 ) Show all articles
-
- How to switch to Decoder mode
- Failover
- How to decode NDI Source
- Can it decode multiple NDI feeds at once?
- Is it possible to decode the NDI® stream emitted by another device using ZowieBox ?
- Why can't it decode NDI from VLC/OBS?
- How to decode a local stream
- How to Use ZowieBox as an RTMP Server for Video Decoding
- How to switch output resolution in decoder mode
- How to configure Failover backup content
- How to decode Resolume Arena's NDI source
- How to use VLC to pull SRT local stream?
- How to set decoding output volume
- How to set decoding HDMI output format and color space
- How to set NDI forwarding after decoding
- How to setup cross-segment decoding via NDI Discovery Server
- Show all articles ( 1 ) Show all articles
-
- How to switch to NDI mode
- How to use NDI Discovery Sever to achieve cross-segment encoding and decoding
- How to use NDI multicast
- How to setup NDI Discovery Server for cross network segment
- Instructions for NDI over WIFI
- How to use NDI Bridge cross-public network transmission
- How to discover device NDI using OBS NDI plugin
- How to get device NDI video in vMix
- Differences between NDI HX1 / HX2 / HX3
- How to convert Full NDI/NDI|HB to HX via NDI Tools Bridge
- NDI group & multicast IP configuration steps
- NDI stream bitrate table for all resolution & frame rate
- Can NDI and WAN RTMP/SRT run at the same time?
- What is NDI6
- NDI License & Feature Usage Guide
-
-
4K Video Encoder/Decoder
-
- Does ZowieBox support PoE?
- How to change device name?
- How to connect with Nintendo Switch?
- How to connect with PS5/4?
- How to connect with X-Box Series?
- How to Connect ZowieBox with Your Devices?
- How to manually update firmware for ZowieBox?
- How to reset ZowieBox to Factory Default?
- How to set the IP address for ZowieBox?
- How to supply power for ZowieBox?
- If I didn't have LAN, how can I visit ZowieBox?
- Instructions for NDI over WIFI
- My computer can't find ZowieBox at NDI tool, what should I do?
- SDI ZowieBox Firmware Release Notes
- What is the login account and password
- Will this save the settings after being disconnected from power?
- ZowieBox Firmware Release Notes
- ZowieBox Pro Firmware Release Notes
- Show all articles ( 3 ) Show all articles
-
- Bitrates corresponding to different resolutions in NDI mode
- Can in record to usb and encode at the same time?
- Can it get multiple NDI feeds as input?
- Can ZowieBox switch to a still image? Like jpeg that says be right back?
- Device is hot, will it has any problem?
- Does it support power pass through? Meaning can the ZowieBox accept or provide power through the USB-C?
- Does ZowieBox support OSD?
- Does ZowieBox support saving video files to local disk?
- FEELWORLD L2 Plus Multi Camera Video Mixer Switcher output cannot be detected
- Get RTSP streaming URL
- Hardware Version and Compatibility
- How can I power for Monitor or PTZ Camera by ZowieBox's DC out?
- How can I use X-Box to control the PTZ Camera via ZowieBox?
- How can I use ZowieBox connect to PTZ Camera?
- How do I fix the no signal problem when capturing a 4KP60 video from PS5?
- How to check recorder status?
- How to configure SRT related parameters?
- How to configure SRT related parameters?
- How to decode a local stream
- How to Decode NDI Source
- How to decode Resolume Arena's NDI source
- How to decode/encode SRT to ZowieBox using vMix
- How to discover ZoiwieBox’s NDI using OBS’s NDI plugin?
- How to improve ZowieBox temperature/fan sound
- How to modify AMD graphics card parameters to make ZowieBox output normal
- How to perform point-to-point(P2P) video transmitter and receiver by Lan
- How to perform point-to-point(P2P) video transmitter and receiver over the Internet
- How to recover ZowieBox if it works abnormally after the upgrade
- How to select level A or level B for 3G SDI output
- How to Set Encoding Bitrate
- How to set up PC display adapter settings when ZowieBox identifies the computer signal source as having an incorrect or unsupported resolution
- How to stream to OBS by SRT
- How to switch HDMI loop out and output?
- How to switch output resolution in decoder mode
- How to switch to Decoder mode?
- How to switch to NDI mode
- How to switch USB between host and device mode
- How to troubleshooting when ZowieBox has no signal when connected to PS5
- How to upgrade with USB
- How to upgrade Zowietek products?
- How to use AVoIP to NDI function
- How to use NAS to save video file
- How to use NDI Discovery
- How to use NDI Discovery Sever to achieve cross-segment encoding and decoding
- How to use NDI multicast?
- How to use pocket3 to streaming to ZowieBox
- How to Use SRT Caller, Listener, and Rendezvous Mode
- How to use SRTMiniSever for streaming
- How to use the UVC function of DJI
- How to use the UVC to HDMI function
- How to use USB MIC
- How to use UVC to NDI function
- How to use video recording
- How to use VLC to pull SRT local stream?
- How to use ZowieAPI with Bitfocus Campanion and Stream Deck for scheduled recording
- How to Use ZowieBox as an RTMP Server for Video Decoding
- How to use ZowieBox connect to Zoom?
- If nothing is captured on the preview screen, what should I do?
- If you use a 3.5 plug input for audio, will that audio also pass through the HDMI output?
- If ZowieBox didn't connect LAN, how can I control the record function?
- Is it possible to decode the NDI® stream emitted by another device using ZowieBox ?
- No Ethernet Port on Laptop, how to extend ethernet to use NDI?
- Recommendations for storage device speed
- SDI Incompatible Devices
- The difference between New Gen ZowieBox and ZowieBox
- The difference between New Gen ZowieBoxSDI and ZowieBoxSDI
- Troubleshooting for audio and video asynchrony in video recording
- Upgrade Troubleshooting
- UVC input compatibility inquiry
- Video file can not be viewed online
- What is the latency from encoding to rendering when using ZowieBox to transmit 4K30 signal?
- What is the latency from encoding to rendering when using ZowieBox to transmit 4K30 signal?
- What is the WiFi6 for?
- What USB dongles does ZowieBox support?
- What video formats can ZowieBox create?
- Whether Zowietek Products Support Decimal Resolution Input, Encoding, and Recording
- Why 4K60/4K50/1080p120/1080p100 input is recognized as 1080p60/50 input?
- Why doesn't ZowieBox support decoding NDI sources from VLC, NDI, OBS, etc.?
- Why is the image green or unavailable when input to the monitor/ATEM?
- Would this be usable by a gaming console? for example, is the HDMI passthrough (with no latency) while recording to YouTube?
- How to Use NTP for Multi-Device NDI Synchronization
- How to control a UVC camera by PTZ Controller and ZowieBox
- Show all articles ( 67 ) Show all articles
-
- Can it store multiple steam keys for YouTube?
- Can ZowieBox stream to multiple destinations at once?
- Do you have to create an event on Facebook and YouTube before every stream or one key works every time if i plug it in the encoder?
- Does this device support RTMP(S), the secure RST that facebook is now requiring?
- How can I solve image and sound out of sync in OBS?
- How to decode a local stream
- How to get ZowieBox working in the OBS?
- How to get ZowieBox's NDI video in vMix?
- How to stream to Facebook?
- How to stream to Twitch?
- How to stream to Wowza
- How to stream to YouTube
- How to troubleshoot when ZowieBox cannot decode NDI
- How to Use OSD Scoreboards
- How to use OSD timestamps
- Is it possible to decode the NDI® stream emitted by another device using ZowieBox ?
- Suggestions for audio asynchrony during streaming to YouTube
- Show all articles ( 2 ) Show all articles
-
-
4K PTZ Camera
-
- Equipment installation and connection
- How to Check ZowiePTZ’s IP Address
- How to install the ZowiePTZ by ceiling mount?
- How to install the ZowiePTZ by wall mount
- How to set up ZowiePTZ to connect with my equipments?
- IR remote control shortcuts
- Led Light
- My computer can’t find ZowiePTZ at NDI tool, what should I do?
- PTZ Quick Start Guide
- ZowiePTZ Firmware Release Notes
-
- Bitrates corresponding to different resolutions in NDI mode
- Can it store multiple steam keys for YouTube?
- Can ZowiePTZ stream to multiple destinations at once?
- Do you have to create an event on Facebook and YouTube before every stream or one key works every time if i plug it in the encoder?
- Does ZowiePTZ support saving video files to local disk?
- Hardware Version and Compatibility
- How can I solve image and sound out of sync in OBS?
- How to change the IP address of ZowiePTZ by IR remote control
- How to change the port of ZowiePTZ by IR remote control?
- How to configure SRT related parameters?
- How to get ZowiePTZ working in the OBS?
- How to improve the asynchrony of audio and video during recording
- How to Mount ZowiePTZ on American-Style Triple-Truss?
- How to restore camera’s default IP setting and password by IR remote control
- How to restore factory defaults by Remote control
- How to stream to OBS by SRT
- How to switch the camera and remote control address
- How to switch to standby mode
- How to upgrade with USB
- How to upgrade Zowietek products?
- How to use NAS to save video file
- How to use NDI Discovery Sever to achieve cross-segment encoding and decoding
- How to use NDI multicast?
- How to Use SRT Caller, Listener, and Rendezvous Mode
- How to use SRTMiniSever for streaming
- How to use Tally light
- How to use USB MIC
- How to use video recording
- How to use VLC to pull SRT local stream?
- How to use ZowieAPI with Bitfocus Campanion and Stream Deck for scheduled recording
- Meaning of indicator lights
- Recommendations for storage device speed
- SDI Incompatible Devices
- Suggestion for different lens working distance
- Troubleshooting for audio and video asynchrony in video recording
- Upgrade Troubleshooting
- Whether Zowietek Products Support Decimal Resolution Input, Encoding, and Recording
- Why does the remote control sometimes not work?
- Why is the image green or unavailable when input to the monitor/ATEM?
- ZowiePTZ operating temperature
- How to Use NTP for Multi-Device NDI Synchronization
- Show all articles ( 26 ) Show all articles
-
- How to control your ZowiePTZ by vMix
- How to control ZowiePTZ by BITFOCUS Companion
- How to control ZowiePTZ by ZowieBox
- How to control ZowiePTZ by ZowiePTZ software
- How to make the remote control direction correspond to the pan/tilt rotation direction
- How to use PTZ IP Controller to control ZowiePTZ
- How to use serial port to control ZowiePTZ
- How to use STREAM DECK to control the ZowiePTZ
- Installing the OBS plugin to your windows PC to control ZowiePTZ by OBS
- Supporting Xbox Joystick control
- Username and password of Onvif protocol
- What are the possible ways I can control ZowiePTZ?
-
-
4K POV Camera
-
- How to adjust camera focus( M12/CS )
- How to calibrate M12 lens AF model
- How to connect to POVZOOM
- How to reset the POV camera to Factory Default?
- How to use C/CS mount lens
- Quickly Install and Connect ZowieCam
- Replacement lens model recommendations
- ZowieCam Firmware Release Notes
- ZowieCam POVZoom Firmware Realease Notes
-
- Bitrates corresponding to different resolutions in NDI mode
- Hardware Version and Compatibility
- How to adapt the button direction to the output direction
- How to change the lens?
- How to check ZowieCam’s IP Address
- How to configure SRT related parameters?
- How to correct the image blur in one corner for ZowieCAM M12 AF?
- How to flip the encoding screen
- How to flip the output screen
- How to improve the asynchrony of audio and video during recording
- How to improve the jitter of the AF model ZowieCam
- How to improve ZowieCam temperature/fan sound
- How to perform noise reduction
- How to record videos with ZowieCam
- How to set up when the color is incorrect
- How to set up when the color is incorrect
- How to stream to Facebook?
- How to stream to OBS by SRT
- How to stream to Twitch?
- How to stream to Wowza
- How to stream to YouTube
- How to switch to standby mode
- How to switch USB between host and device mode
- How to use button to operate OSD menu
- How to use NAS to save video file
- How to use NDI Discovery Sever to achieve cross-segment encoding and decoding
- How to use NDI multicast?
- How to use OSD menu to adjust output resolution
- How to Use OSD Scoreboards
- How to use OSD timestamps
- How to use shortcut functions
- How to Use SRT Caller, Listener, and Rendezvous Mode
- How to use Tally Light
- How to use the UVC OUT function
- How to use VLC to pull SRT local stream?
- How to use ZowieAPI with Bitfocus Campanion and Stream Deck for scheduled recording
- SDI Incompatible Devices
- Suggestions for audio asynchrony during streaming to YouTube
- Troubleshooting for audio and video asynchrony in video recording
- Upgrade Troubleshooting
- Whether Zowietek Products Support Decimal Resolution Input, Encoding, and Recording
- Why is the image green or unavailable when input to the monitor/ATEM?
- Why sometimes using the OSD menu to modify parameters is not effective?
- Why sometimes using the OSD menu to modify parameters is not effective?
- ZowieCam operating temperature
- How to Use NTP for Multi-Device NDI Synchronization
- Show all articles ( 31 ) Show all articles
-
-
PTZ Controller
-
- How are the buttons on the ZowieKBD organized?
- How to add a camera to ZowieKBD via ONVIF?
- How to add a Camera to ZowieKBD via serial protocol?
- How to add a camera to ZowieKBD via Sony VISCA?
- How to add a camera to ZowieKBD via VISCA Over IP?
- How to add an NDI camera to ZowieKBD?
- How to add/modify groups?
- How to connect ZowieKBD to network and power?
- How to modify the added camera?
- How to Single/Four-grid/HDMI output switch?
- How to switch active camera/group?
- User manual
- What are the ports on the back of the ZowieKBD used for?
- What are the shortcut button functions on ZowieKBD?
- ZowieKBD Firmware Release Notes
-
- How do I navigate the ZowieKBD menu with the joystick or knob?
- How to Add or Edit Camera Groups in ZowieKBD?
- How to Modify or Edit an Existing Camera in ZowieKBD?
- How to Set, Call, or Reset Presets on ZowieKBD to Factory Default?
- How to Switch Between Active Cameras or Groups in ZowieKBD?
- How to Switch Display Modes or Output Priorities on ZowieKBD?
- What information is shown on the ZowieKBD screen?
- How to control a UVC camera by PTZ Controller and ZowieBox
-
- Can I use two or three protocols to control different PTZ camera at same time?
- Can the controller be turned off when using POE?
- Can the gateway IP address be changed?
- Comparison of PTZ Controller Parameters
- Does the RS232 and RS485/422 work on this controller?
- Does this controller support VISCA over IP ?
- How many presets (max) per camera can you set up?
- How to search the camera by ONVIF
- How to set preset and call preset?
- How to upgrade Zowietek products?
- How to use PTZ IP Controller to control ZowiePTZ
- I tried to connect in the network but the Gateway IP address and DNS server could not be changed. Could you tell me how to change them?
- Setting up your PTZ Network Controller
- When the PTZ camera is mounted on the ceiling, I go right with the joystick the camera goes left and when I push the joystick to the left it goes. How can I fix this problem?
- Will this viewer work with 4k camera system?
-
-
4K Video Recorder
-
- How to connect with Nintendo Switch?
- How to connect with PS5/4?
- How to connect with X-Box Series?
- How to playback?
- How to re-pair the remote control?
- How to record RCA (CVBS) input?
- How to record video in 4K resolution?
- How to set the IP address for ZowieBox?
- How to upgrade firmware?
- How to upgrade with USB
- Quick Start Guide
- Remote Control Layout Overview
- What is the login account and password
- What is ZowieREC?
- Which input devices does ZowieREC support?
- Which video signals does ZowieREC support?
- Will this save the settings after being disconnected from power?
- ZowieREC Firmware Release Notes
- Show all articles ( 3 ) Show all articles
-
- After recording to USB. Can I play to tv the one recording in USB ?
- Can HDMI output 4k?
- Can I hook this up to a console to play games?
- Can I pause my recording and restart the recording when I am taking a break?
- Can I record videos directly from a Smart TV?
- Can I use it as a DVR?
- Can I use this to record from iphone apps?
- Can I watch one program while recording another?
- Can it record 4K60 or 1080P120?
- Can it record off dish network?
- Can it store multiple steam keys for YouTube?
- Can this be used for surveillance systems?
- Can ZowieBox stream to multiple destinations at once?
- Device is hot, will it has any problem?
- Does it capture 5.1 dolby audio?
- Does it support 2.1 or 8k hdmi cables?
- Does it support HDCP?
- Does it support live streaming?
- Does it support recording 4k60?
- Does it support scheduled recording?
- Does the recorder support HDR?
- Does ZowieREC support AV port DVD player?
- How are video segments split?
- How can I power for Monitor or PTZ Camera by ZowieBox's DC out?
- How do I get the video and audio out of my high end TV into this box? Will the HDMI cable do that or are you using other mean to accomplish this?
- How many KB/s does this record at? (bit rate)
- How to adjust the fan speed if ZowieREC feels hot?
- How to check recorder status?
- How to login the ZowieRec's WEB Console?
- How to record YouTube videos to USB storage device with ZowieREC?
- How to stream to Facebook?
- How to stream to Wowza
- How to stream to YouTube
- How to switch to loopout mode
- How to use NAS to save video file
- How to Use SRT Caller, Listener, and Rendezvous Mode
- How to use ZowieAPI with Bitfocus Campanion and Stream Deck for scheduled recording
- How to Use ZowieBox as an RTMP Server for Video Decoding
- I want for TV to record shows. Is this easy to use and easy to fast foward though the commericals?
- If you use a 3.5 plug input for audio, will that audio also pass through the HDMI output?
- Troubleshooting for audio and video asynchrony in video recording
- Whether Zowietek Products Support Decimal Resolution Input, Encoding, and Recording
- Will this play a video previously recorded on a external hard drive from a dish network receiver?
- Show all articles ( 28 ) Show all articles
-
-
AI PTZ Camera
-
- AI PTZ Camera(1080P Version) - HDMI & SDI output delay
- Does AI Tracking Camera supports ZowiePTZ?
- How do I connect Mac PC to the AI PTZ camera?
- How to find PTZ IP address?
- How to restore camera’s default IP address,username and password?
- How to restore factory defaults
- How to update the new firmware
- How to upgrade the firmware at MAC OS?
- How to upgrade Zowietek products?
- How to use PTZ NDI Camera connect Skype, Zoom
- How to use USB MIC
- Which video formats does PTZ compatible with BlackMagic devices?
-
- How to feed RTSP from ZOWIETEK PTZ cameras into some commonly used video mixing software (OBS, vMix)
- How to get PTZ cameras working in OBS
- How to get PTZ cameras’ videos in vMix
- RTMP live streaming to Facebook directly from the AI PTZ camera
- RTMP live streaming to YouTube directly from the AI PTZ camera
-
PTZ Camera
-
- Does this camera need the power adapter if I use a POE switch?
- How do I change the IP address of PTZ Camera?
- How do I connect Mac PC to the PTZ camera?
- How do I set the PTZ camera to be on my network?
- How to find PTZ IP address
- How to restore camera's default IP address,username and password in IR remote control
- How to restore factory defaults
- How to upgrade Zowietek products?
- How to use PTZ NDI Camera connect Skype, Zoom
- How to use USB MIC
- How to Use NTP for Multi-Device NDI Synchronization
-
- How to control PTZ camera by BITFOCUS Companion
- How to control PTZ Camera by ZowiePTZ
- How to control your PTZ cameras by vMix
- How to get PTZ NDI Camera working in NDI
- How to set VISCA/Pelco-D/Pelco-P protocol at PTZ controller and PTZ camera
- How to use STREAM DECK to control the PTZ camera
- If I set a preset using the remote control, can I call that preset from the IP interface?
- Installing the OBS plugin to your windows PC to control PTZ camera by OBS
- IR remote control shortcuts
- Supporting Xbox Joystick control
- What are the possible ways I can control my PTZ camera?
-
- How do I stream to YouTube live with vMix?
- How do I use OBS to push streams?
- How do I use vMix to pull RTSP streams?
- How to feed RTSP from ZOWIETEK PTZ cameras into some commonly used video mixing software (OBS, vMix)
- How to get PTZ cameras working in the OBS
- How to get PTZ cameras’ videos in vMix
- How to pull stream through RTSP(VLC)
- RTMP live streaming to Facebook with PTZ camera
- RTMP live streaming to YouTube with PTZ camera
-
Streaming Encoder
-
- Does the LiveV400 support OSD?
- How to get a RTMP(S) URL?
- How to get LIveV400’s Serial Number
- How to update the firmware?
- How to upgrade Zowietek products?
- Is device video collage supported?
- Is the LiveV400 supposed to run hot?
- The sound of the fan of LiveV400 affected me, how to solve this problem
- What cameras are compatible with the LiveV400?
- What platforms can I stream to with LiveV400?
- What resolutions and framerates can the LiveV400 stream?
- What to do if the video is not clear
-
- Can the LiveV400 stream to multiple destinations at once?
- How to aggregate the network to make the live more smooth
- How to bond
- How to connect the LiveV400 to the internet
- How to use SIM card to connect to the network?
- Preparation before pushing the stream
- The most important step to use the built-in 5G/4G(APN setting)
- Which 4G(LTE)USB dongle does the LiveV400 support?
- Which bands(frequencies) does the LiveV400 support?
-
ZowieX
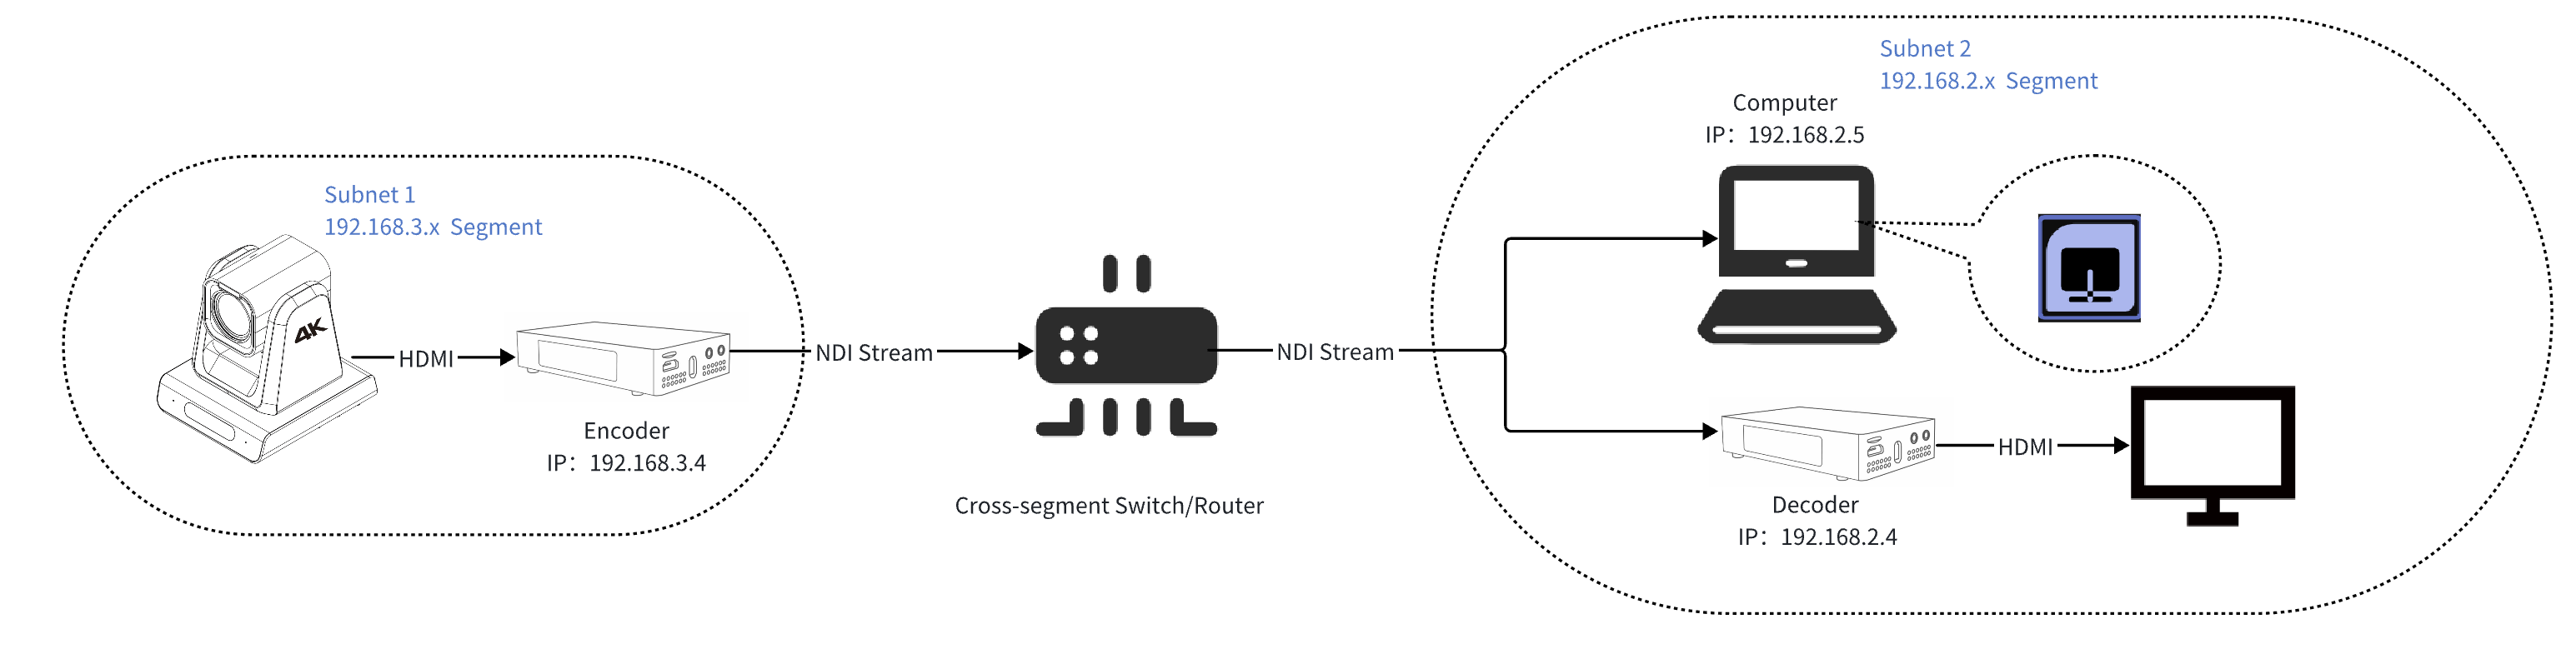
For LANs with multiple subnets or without mDNS, Zowietek series products (ZowieCam, ZowiePTZ, ZowieBox) support NDI discovery server after version 1.0.2.30 to achieve cross-segment encoding and decoding without relying on a computer.
Preparation before configuring cross-segment transmission:
- Please make sure that your Zowietek device version is higher than 1.0.2.30.
- Please make sure that your switch or router supports the cross-segment function.
Method 1: Use NDI discovery server of Zowietek products for cross-segment encoding and decoding without a computer
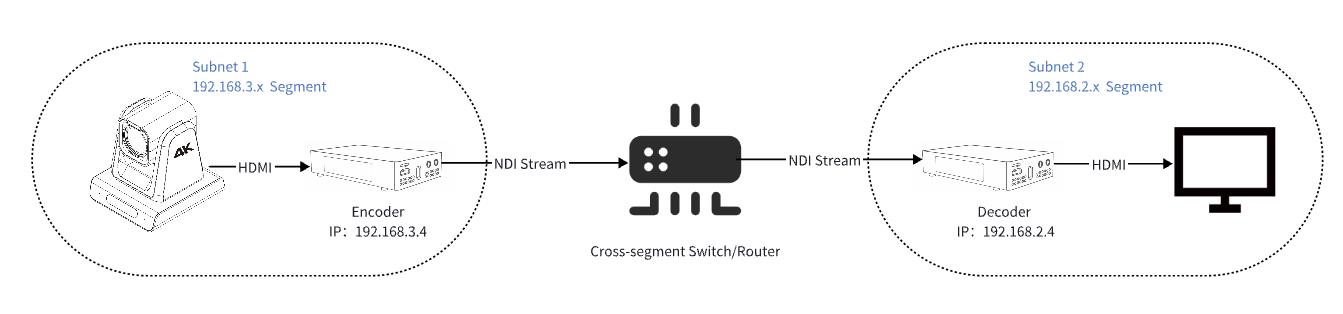
Step 1:
Log in to the web console of the encoding device (e.g:192.168.3.4) and click Setting->Streaming ->NDI. Turn on the NDI switch and turn on the NDI Discovery button. Fill in the IP address of the decoder (e.g:192.168.2.4)
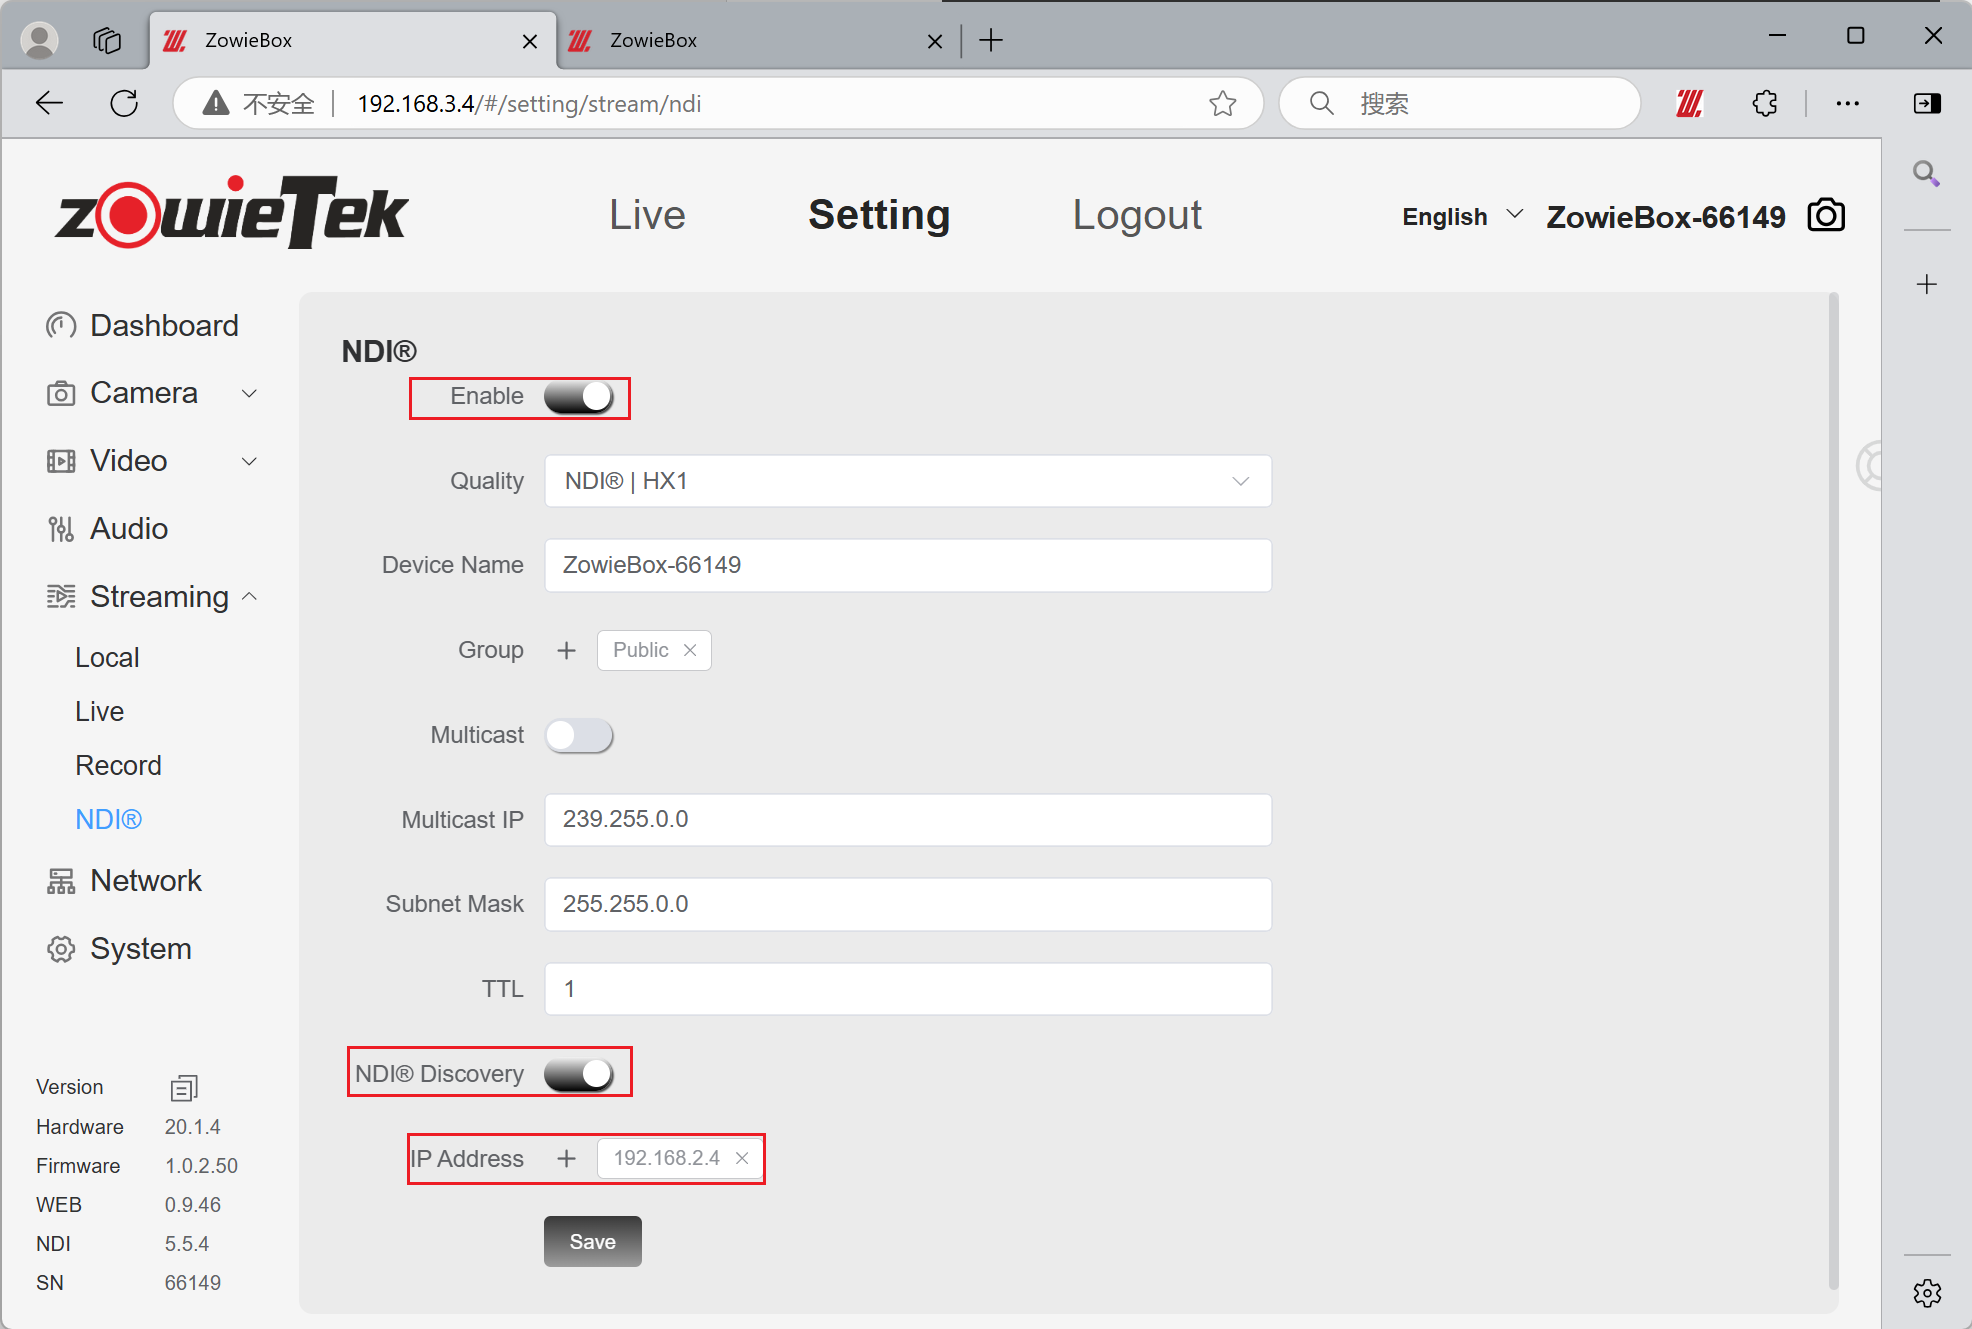
Click the Save button.
Step 2:
Click Setting->System to restart the device.
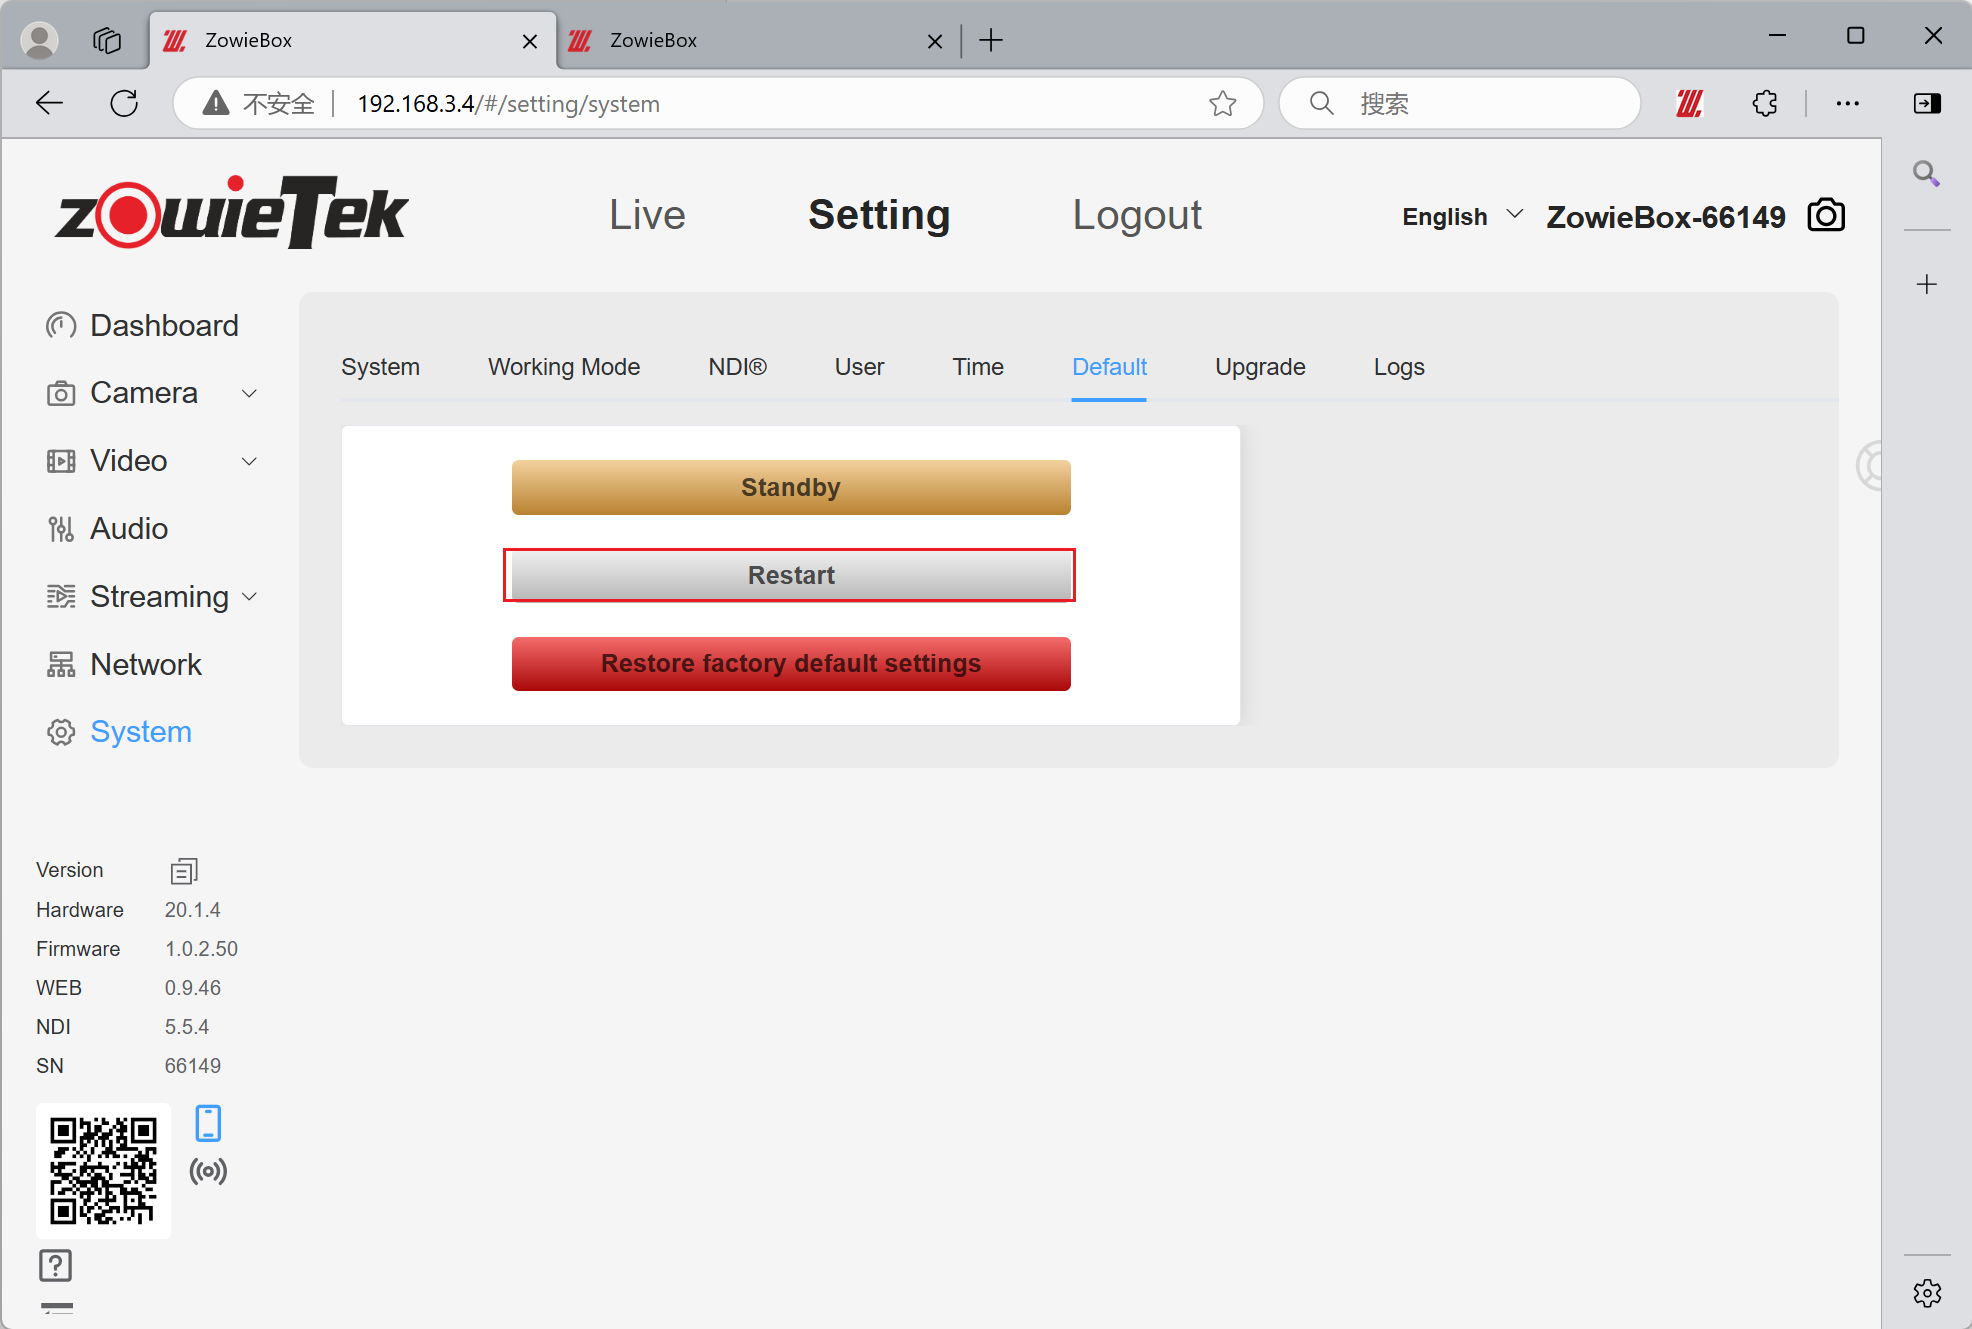
Step 3:
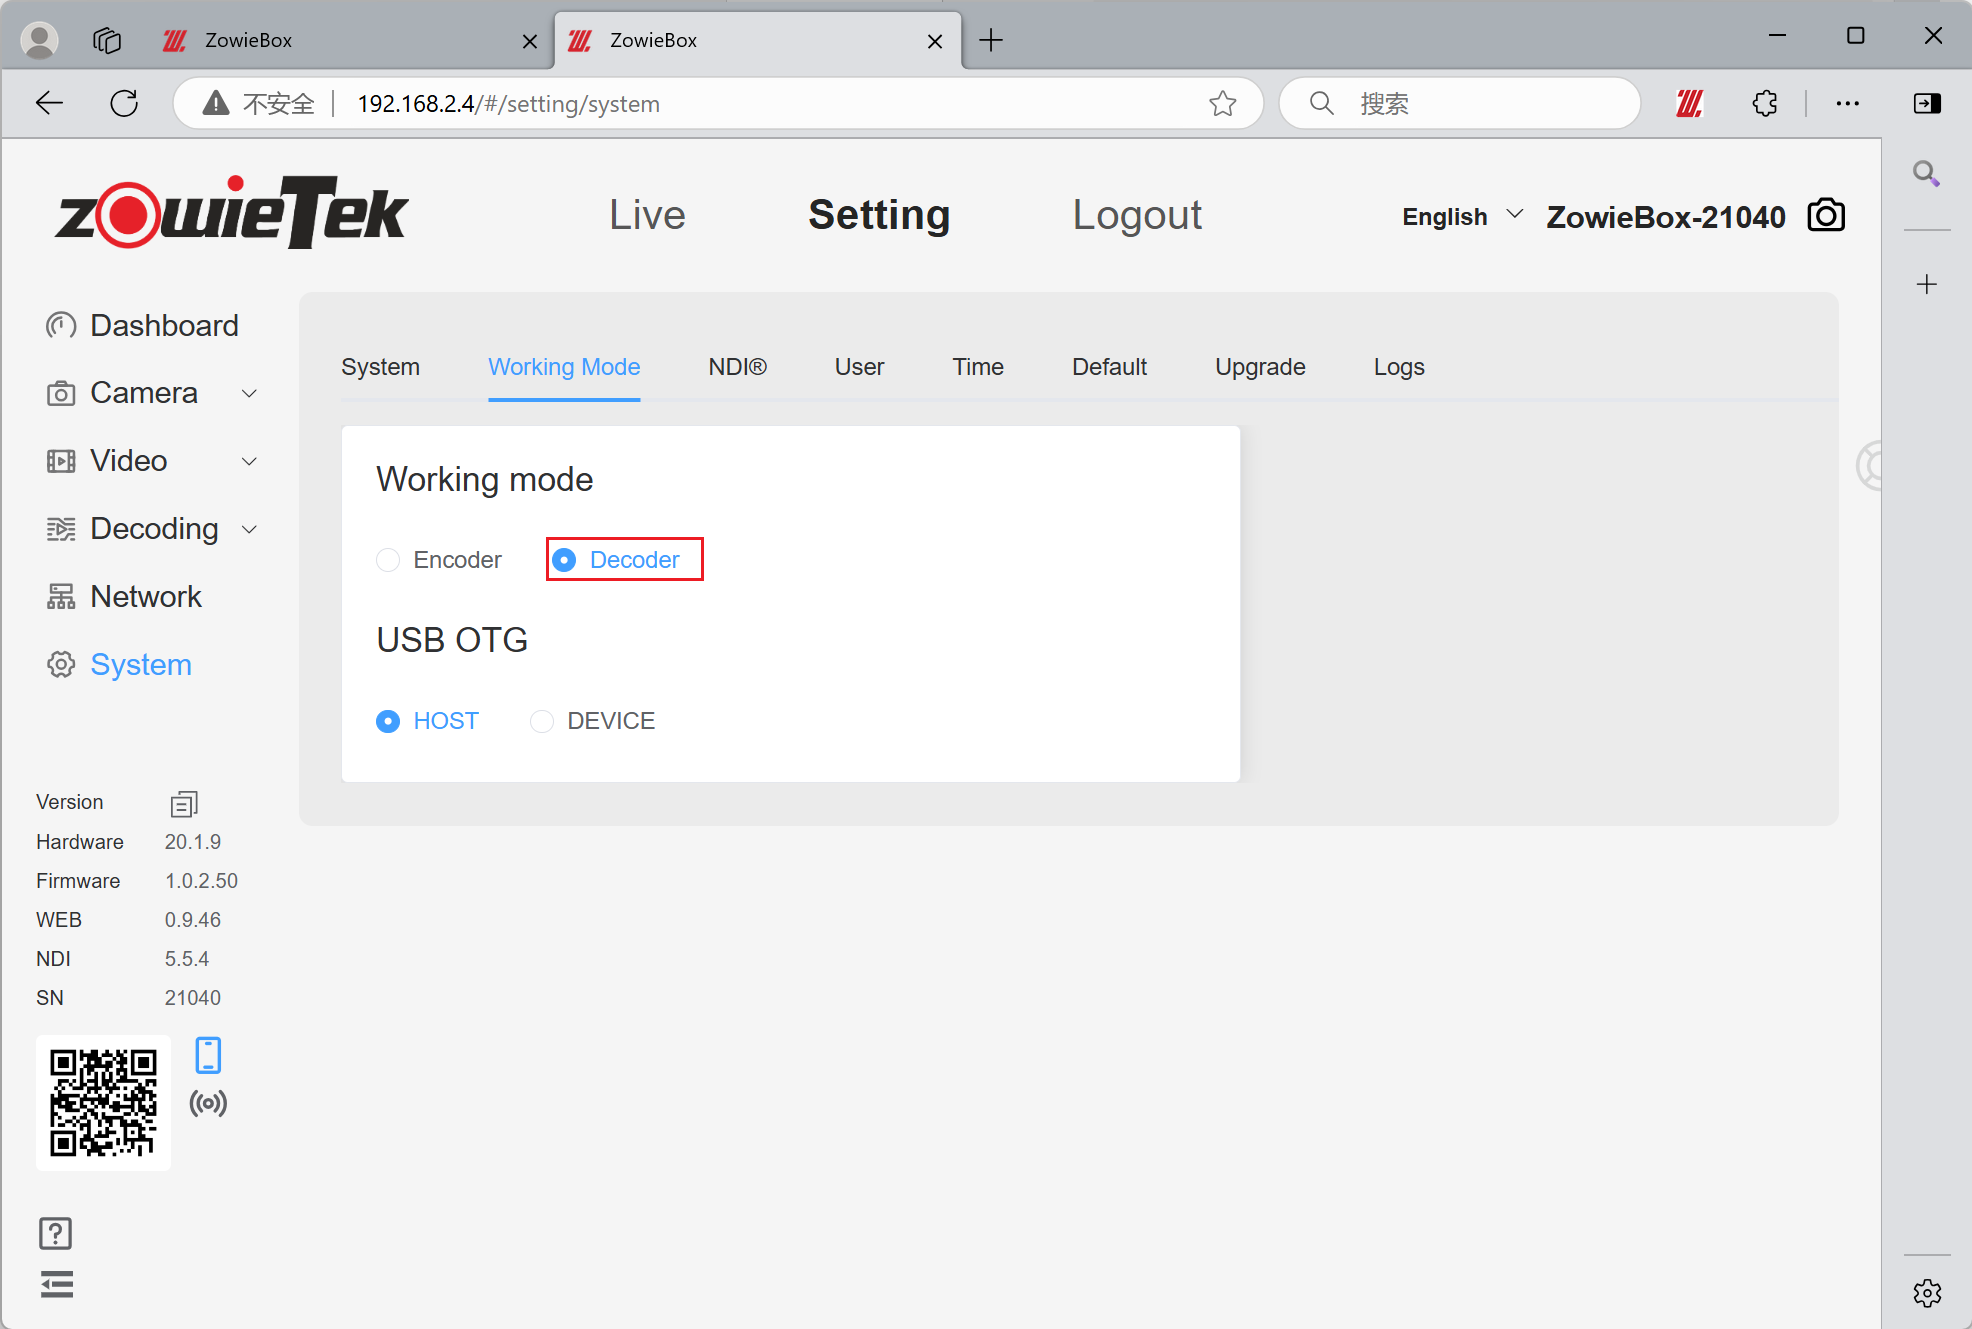
Log in to the web console of the decoding device (e.g:192.168.2.4), click Setting->System ->Working Mode, and switch the working mode to decoder.
Step 4:
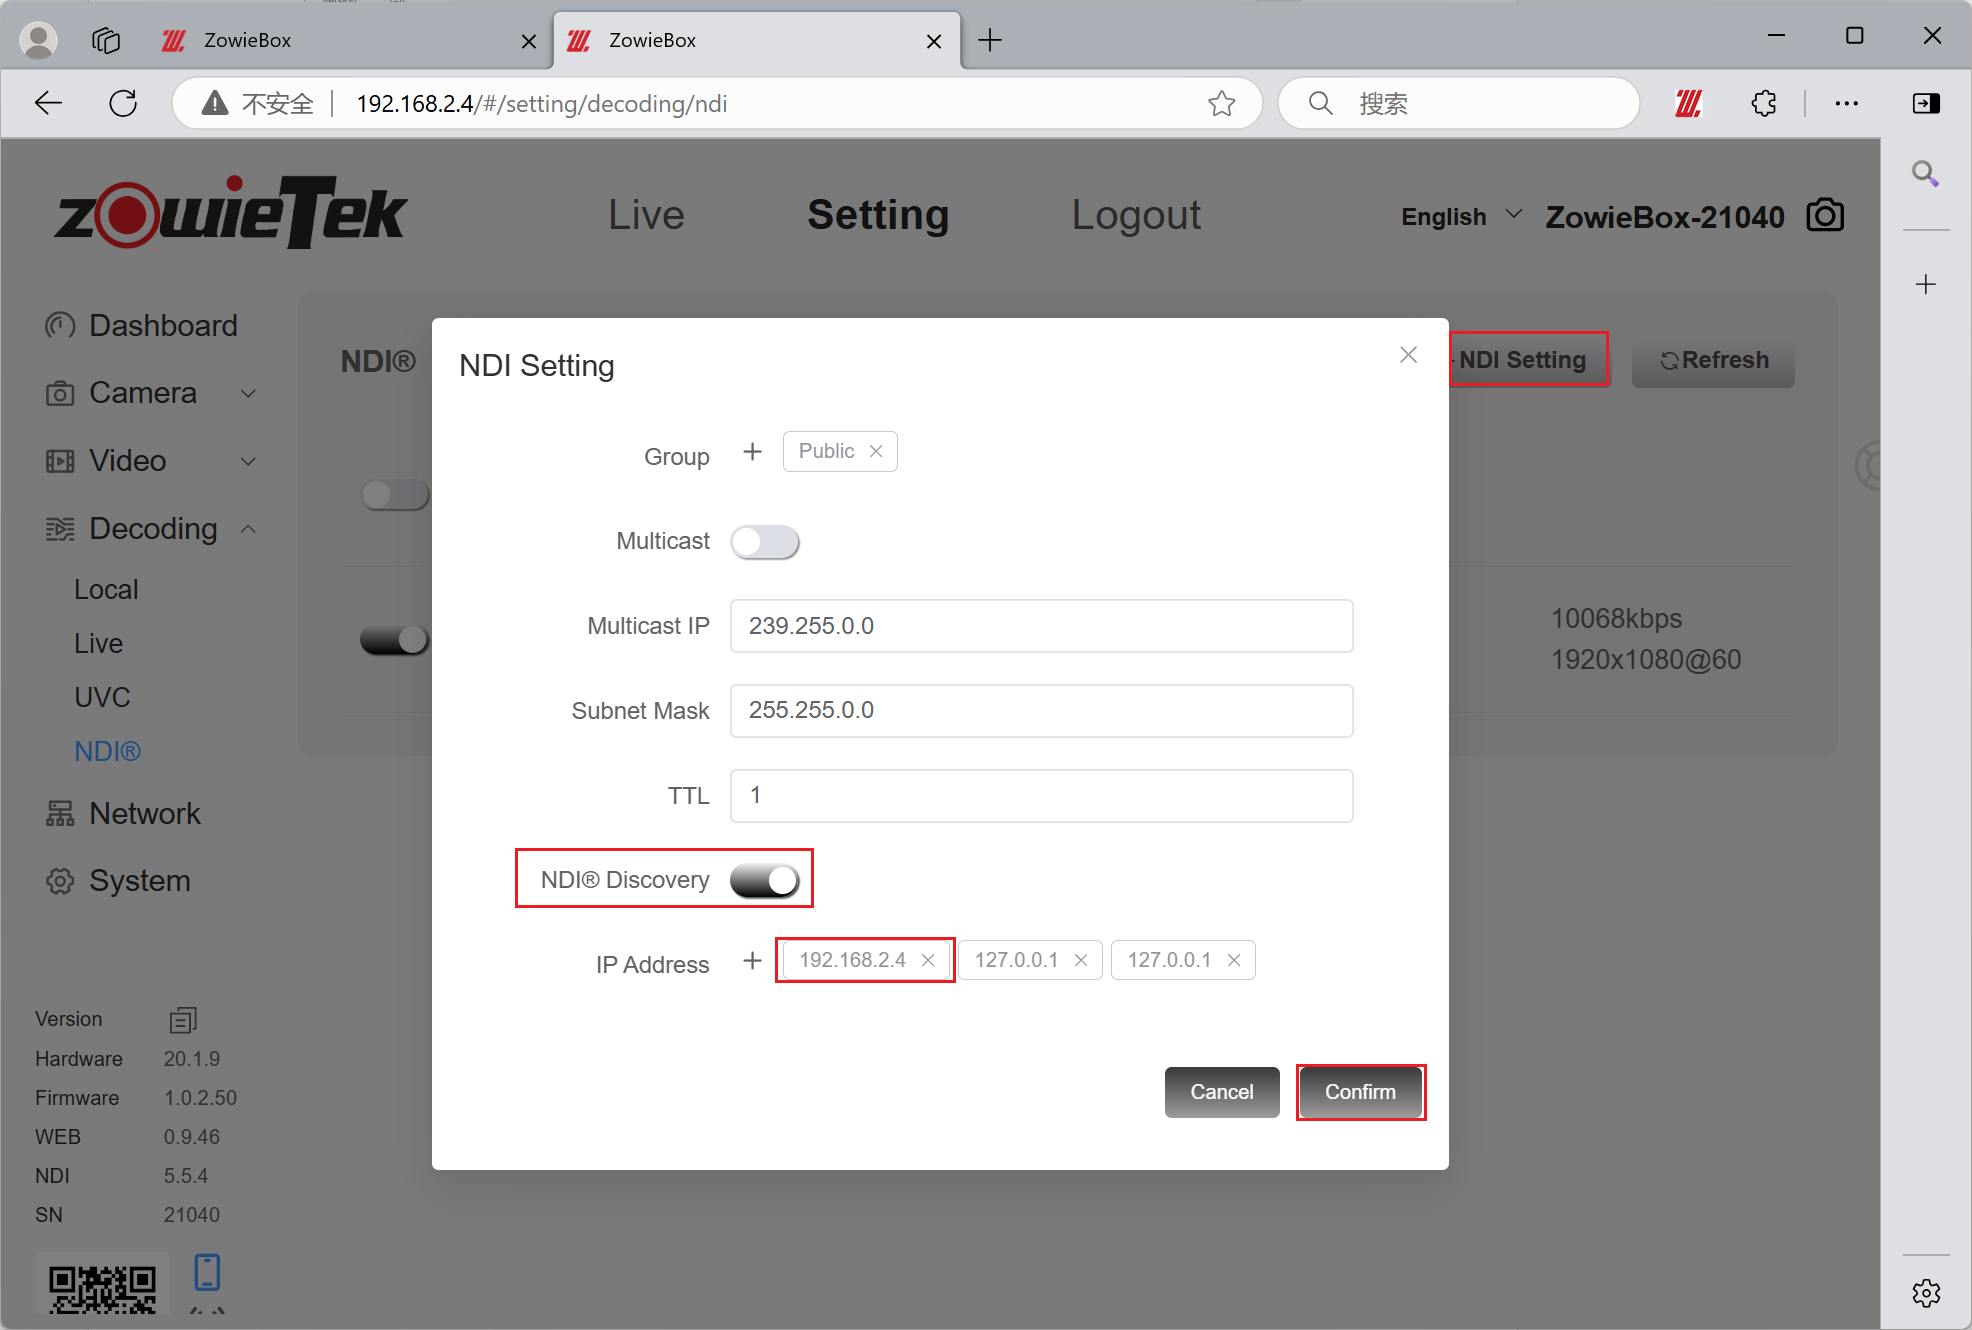
Click Setting->Decoding ->NDI. Click +NDI Setting. Open the NDI Discovery button below, enter your own IP in the IP address (192.168.2.4) and click Confirm.
Step 5:
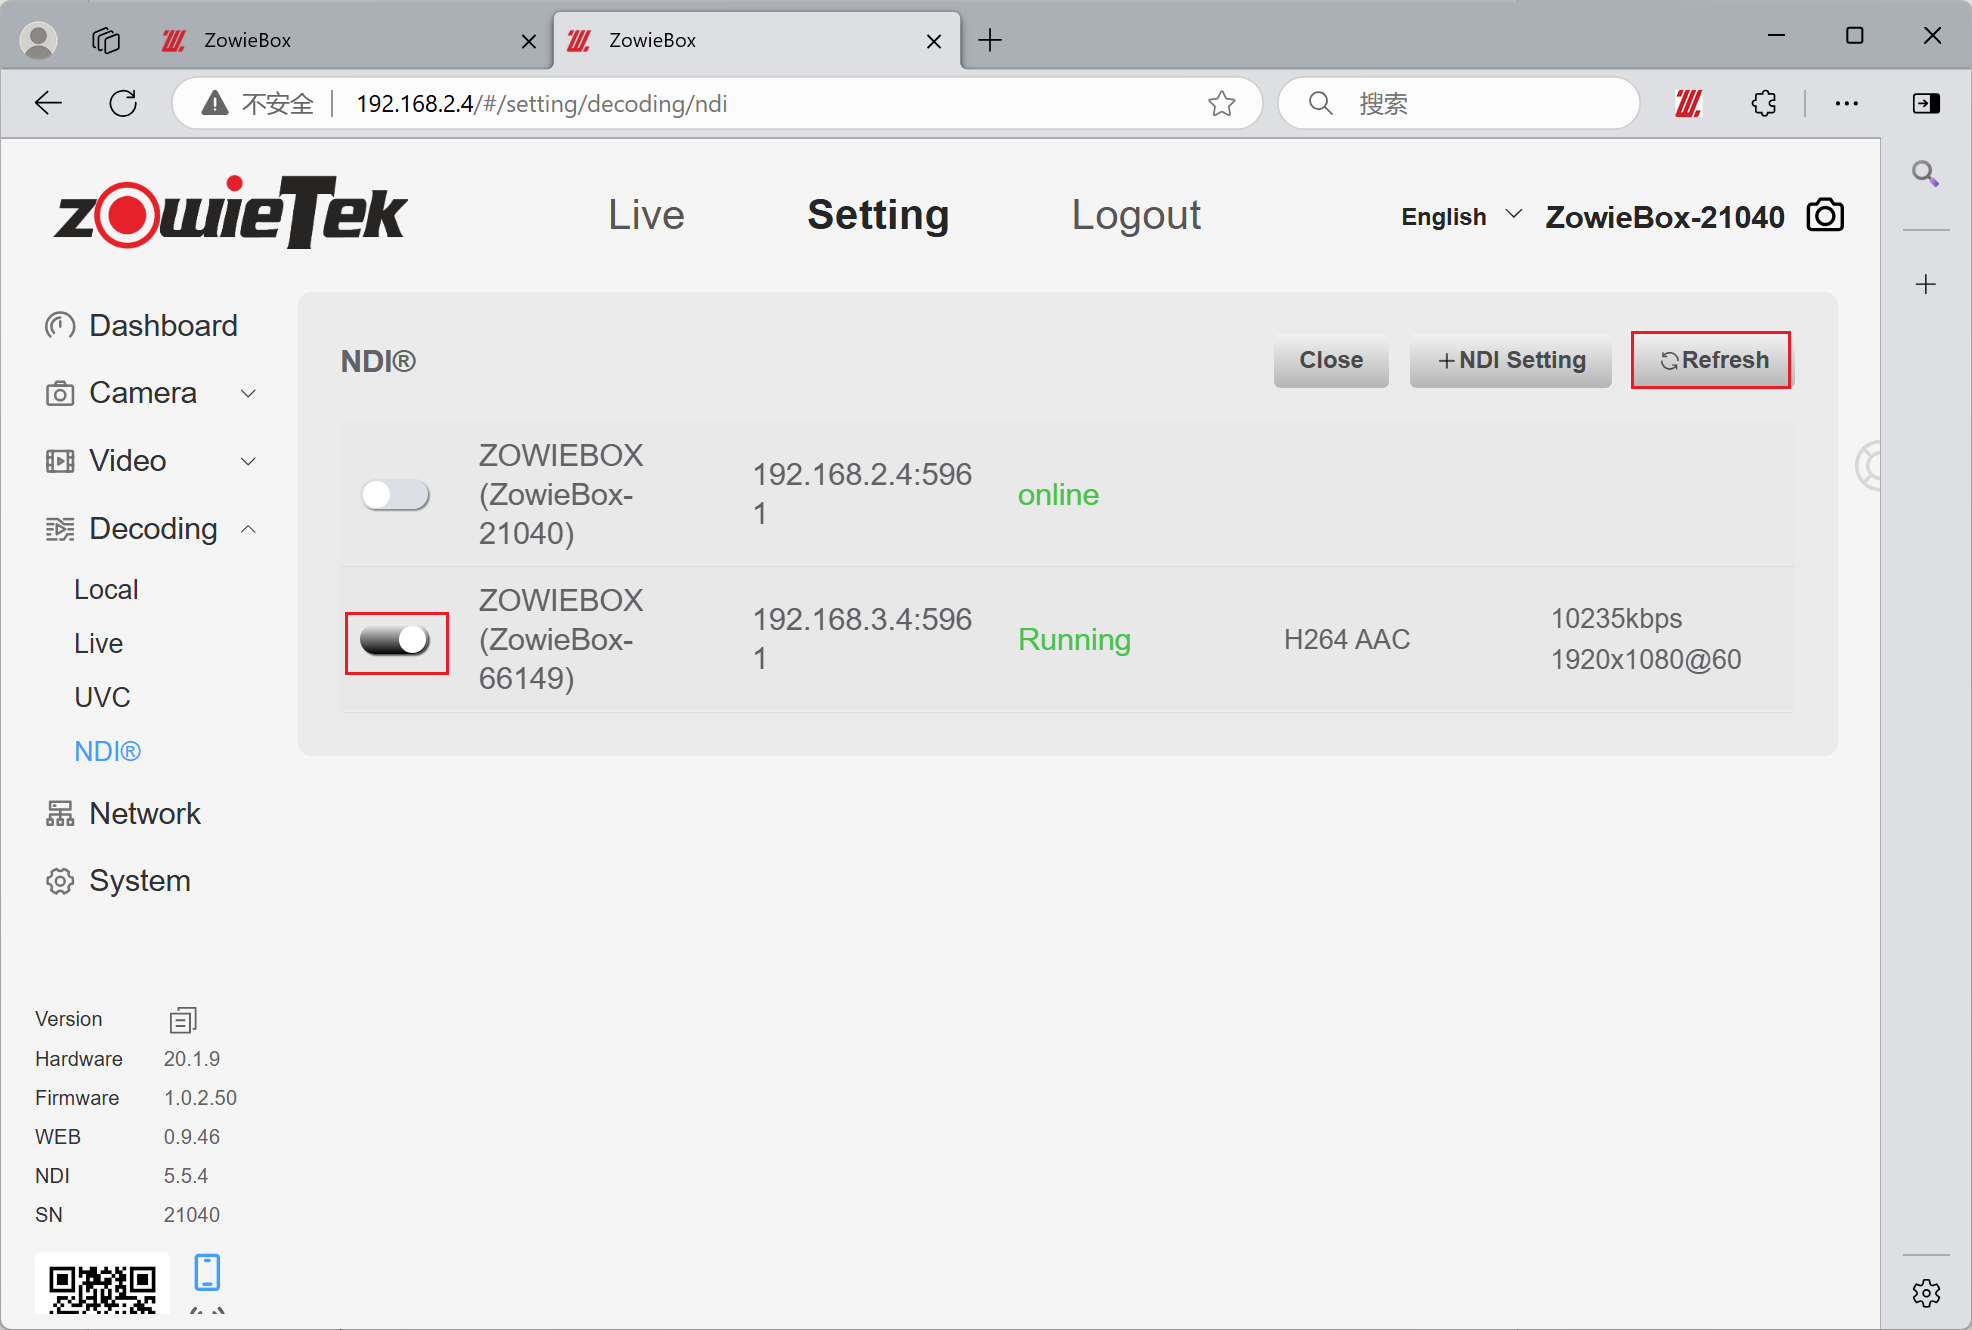
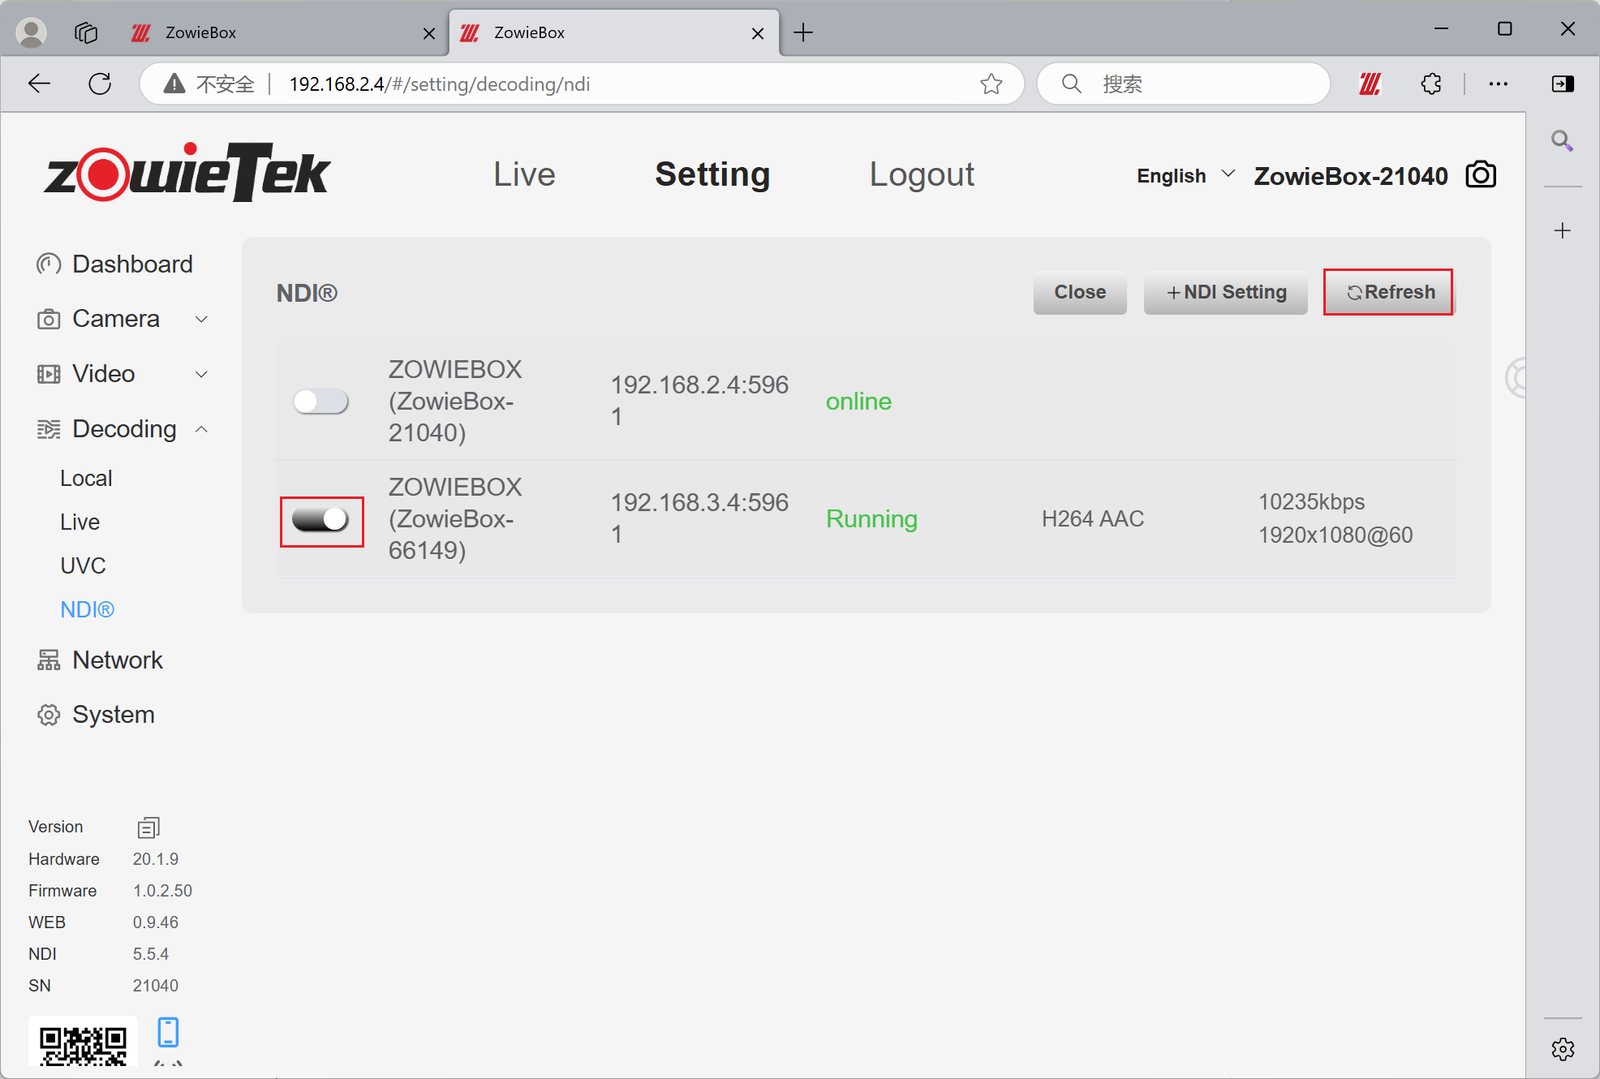
After the setting is successful, click the refresh button to discover the NDI of the encoding device. Click the decoding button on the left to start decoding.
Method 2: Use a computer for cross-segment NDI encoding and decoding
Step 1:
Log in to the web console of the encoding device (e.g:192.168.3.4) and click Setting->Streaming ->NDI. Turn on the NDI switch and turn on the NDI discovery button. Fill in the IP address of the decoder (e.g:192.168.2.4)
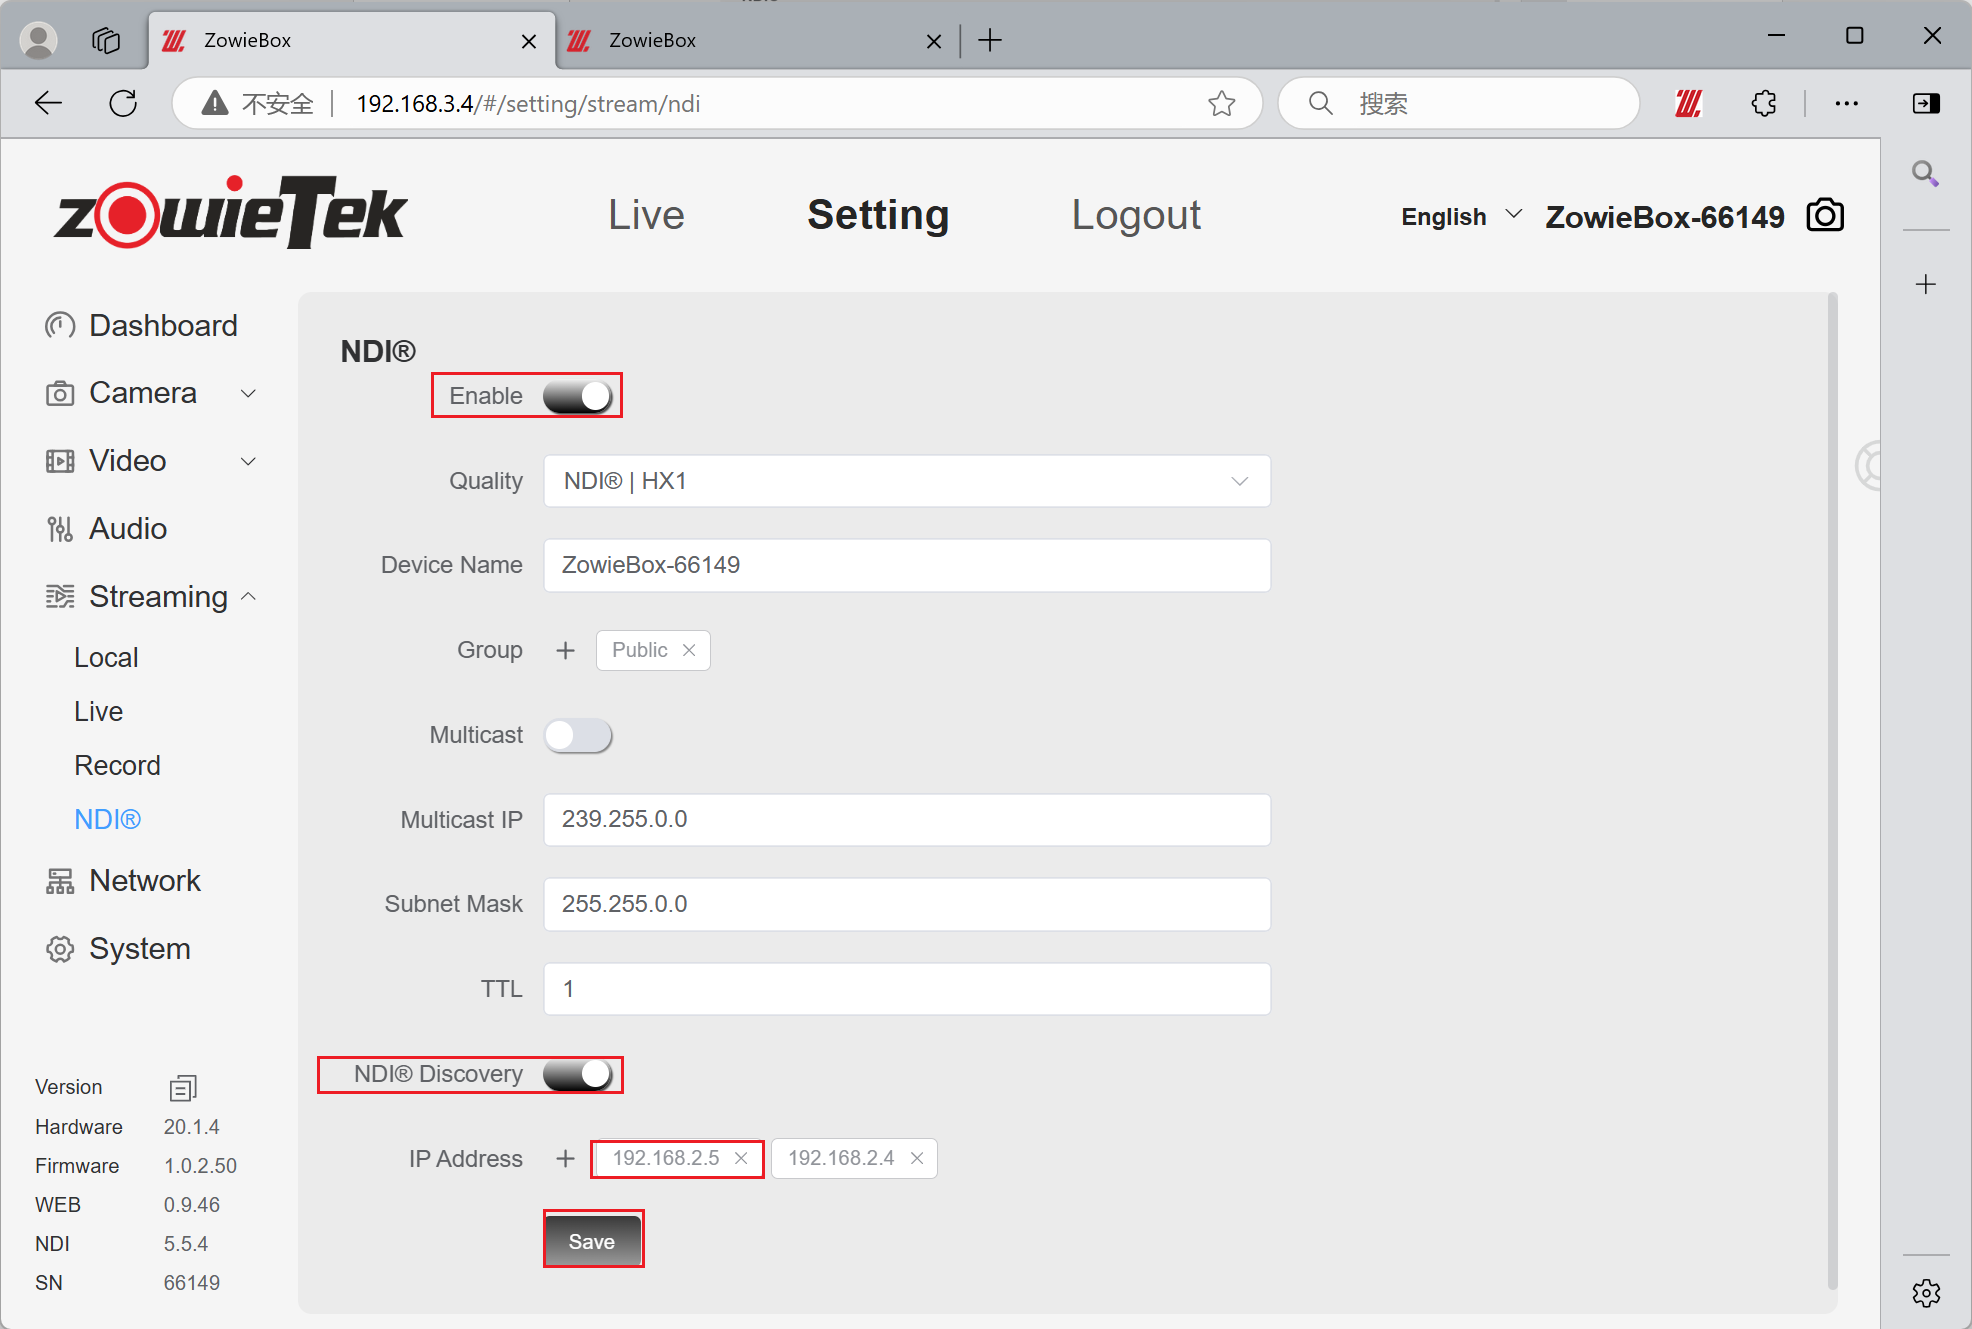
Click the Save button to confirm that the save is successful.
Step 2:
Click Setting->System to restart the device.
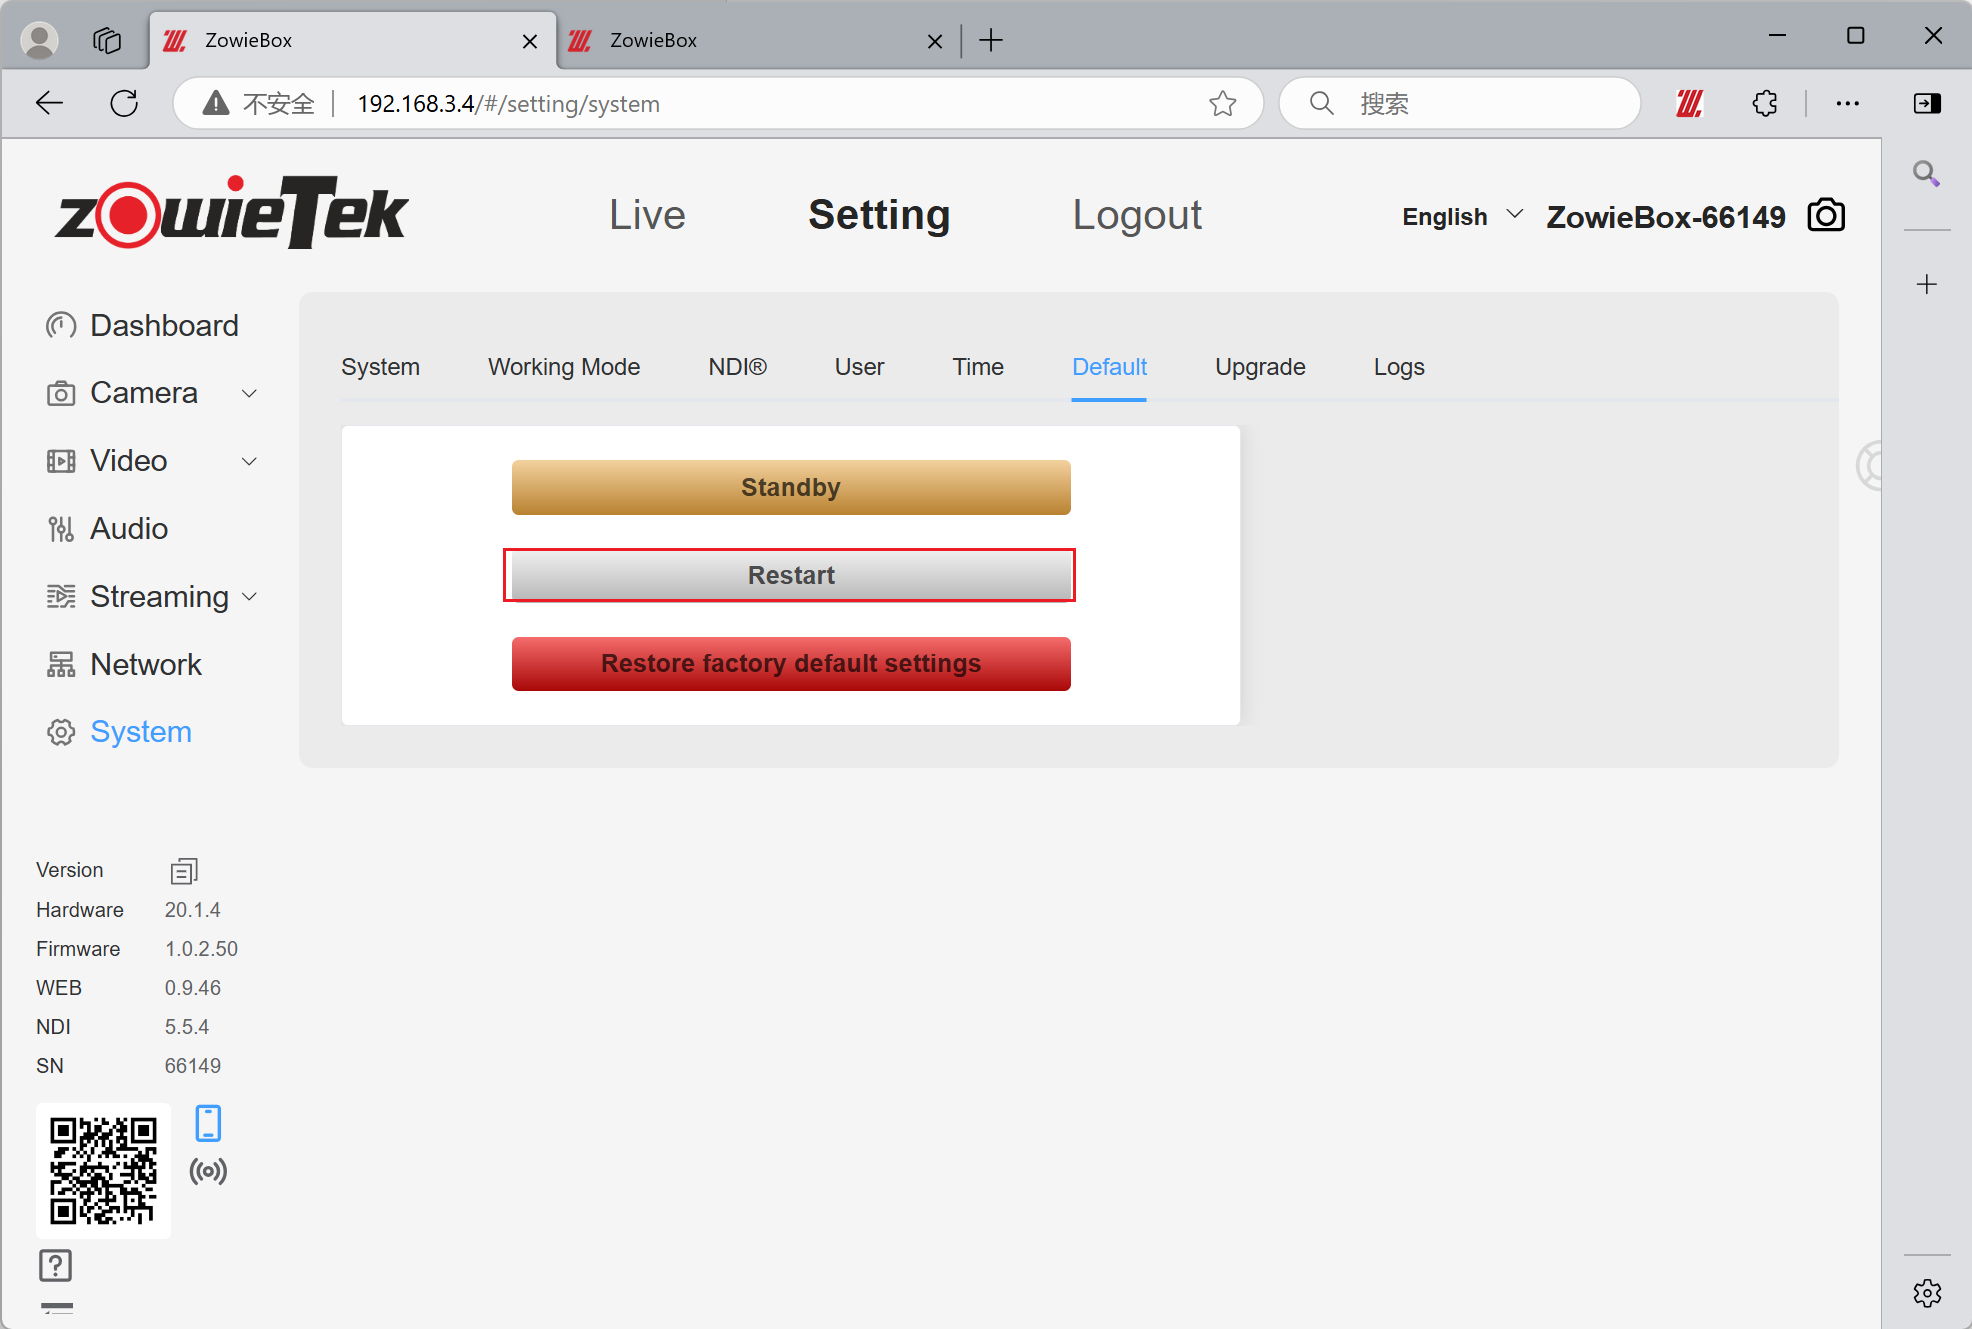
Step 3:
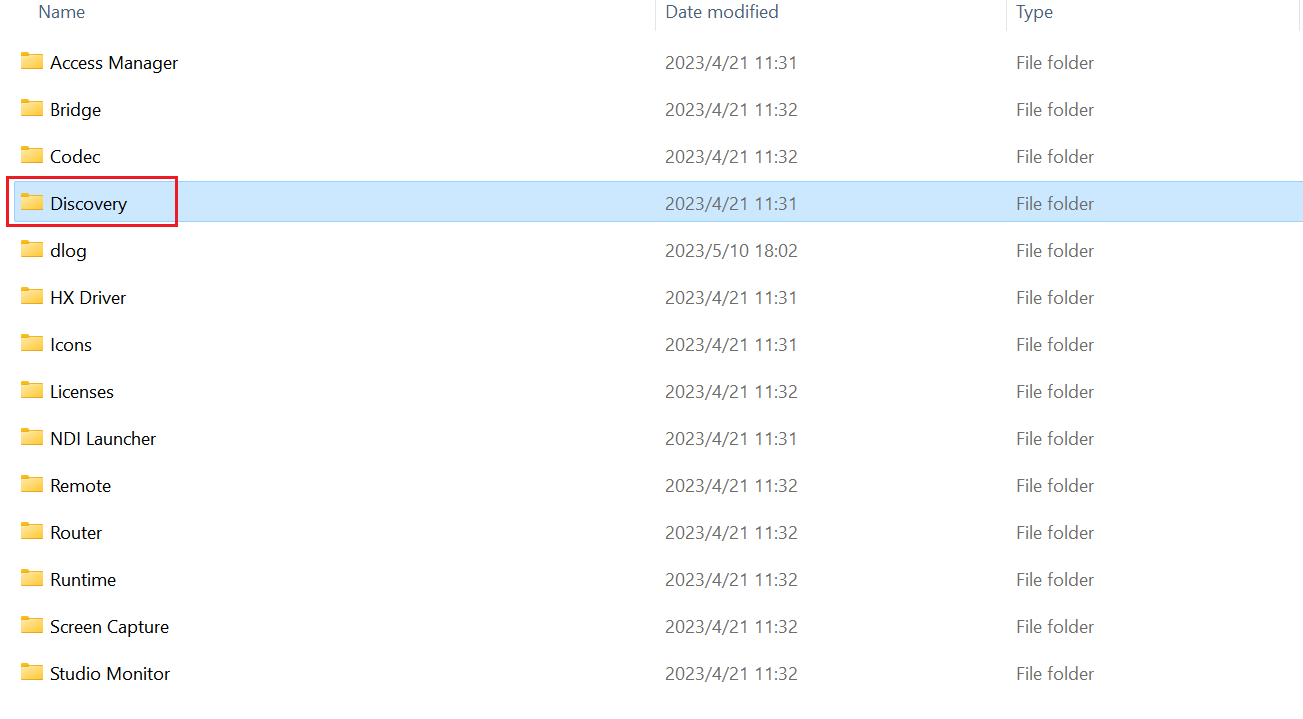
Select the NDI icon on the computer desktop, right-click and select Open the location of the file.
Step 4:
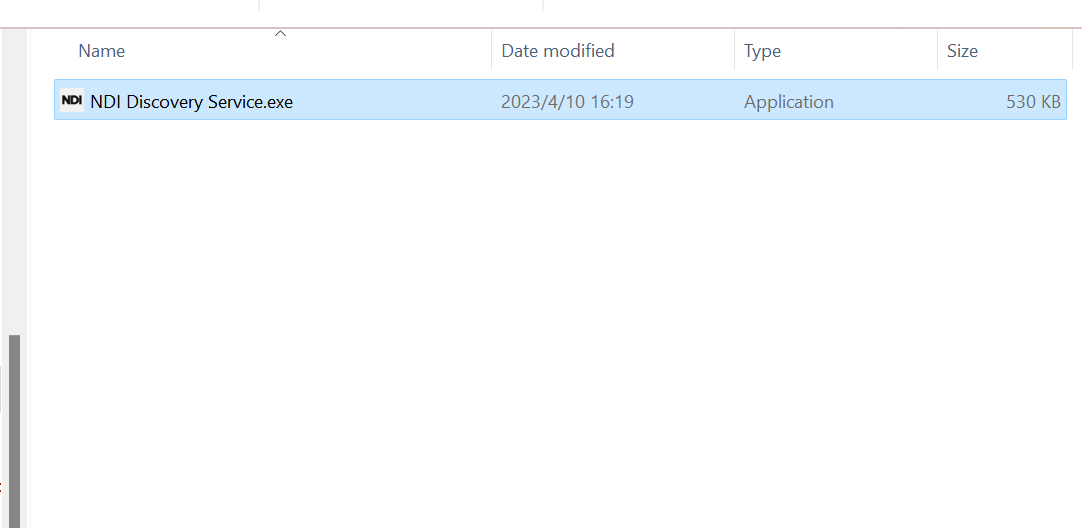
Select the Discovery folder in the folder and double-click to run NDI Discovery Service
Step 5:
Open the Access Manager tool in the NDI tool.
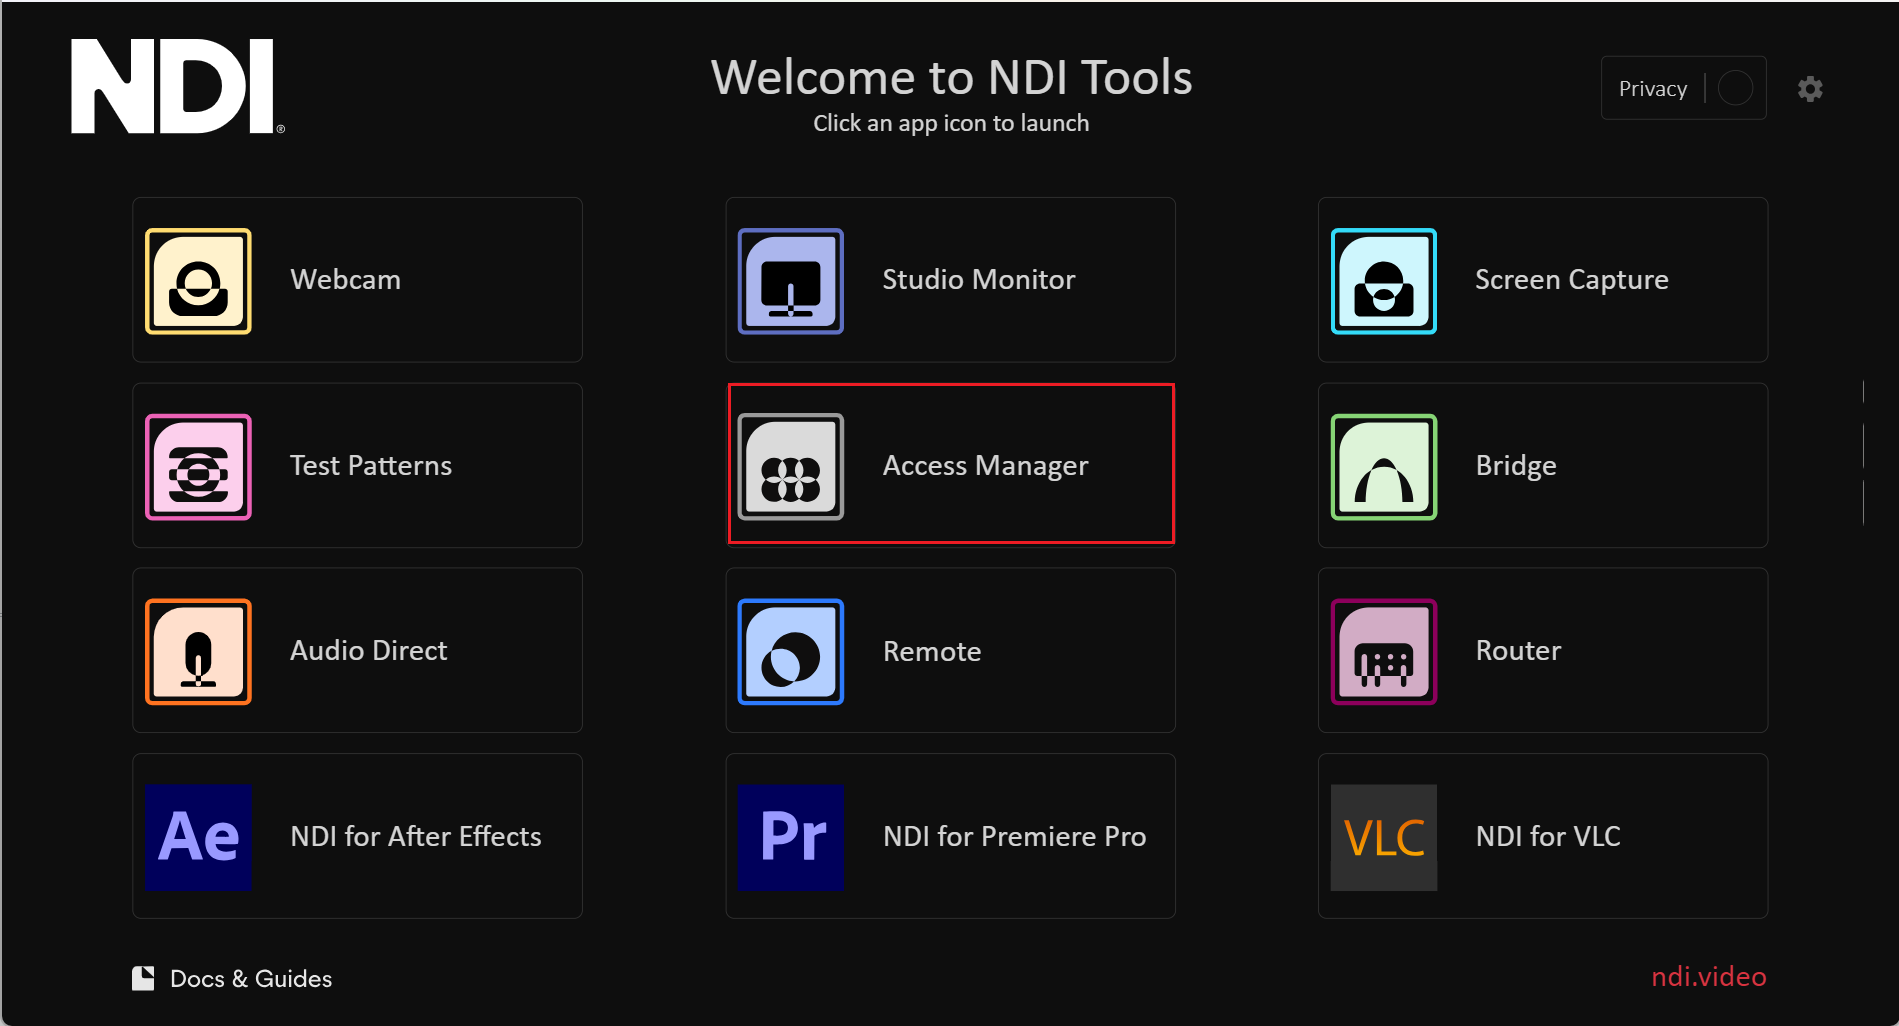
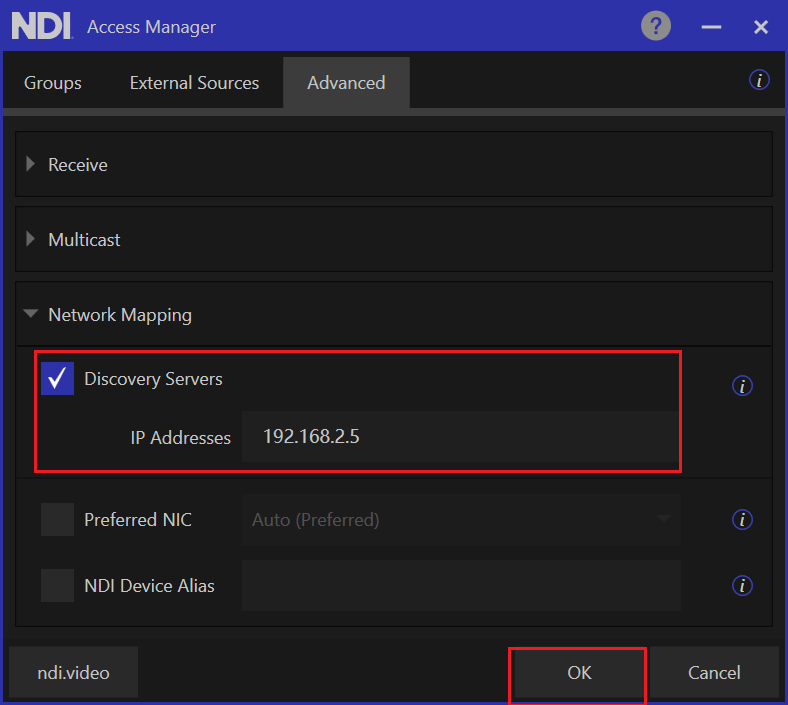
Step 6:
In Advanced settings, check Discovery Servers and enter the IP address of the device to be discovered. After the setting is successful, click Confirm.
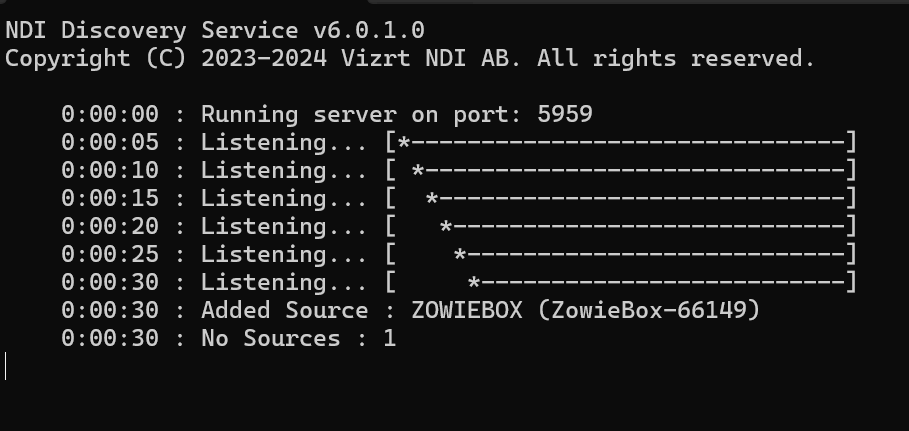
Step 7:
After waiting for a while, the NDI Discovery Service software opened in step 6 will discover the NDI source.
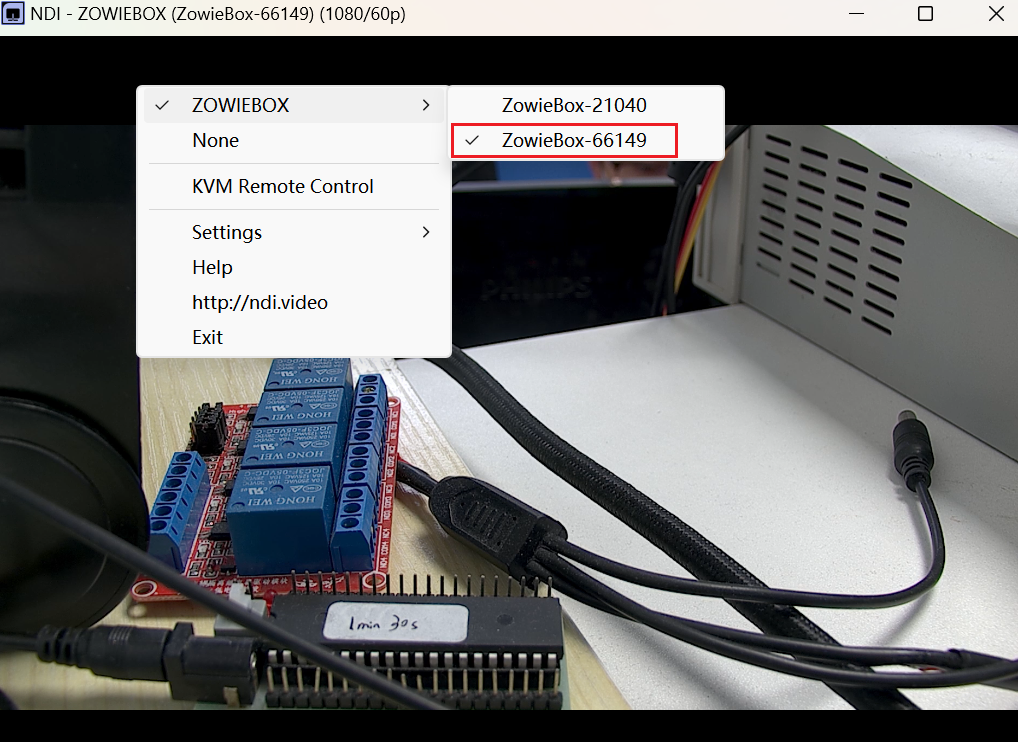
At this time, open NDI monitor to view the screen of the NDI device.
Step 8:
Log in to the web console of the decoding device (e.g:192.168.2.4), click Setting->System ->Working Mode, and switch the working mode to decoder.
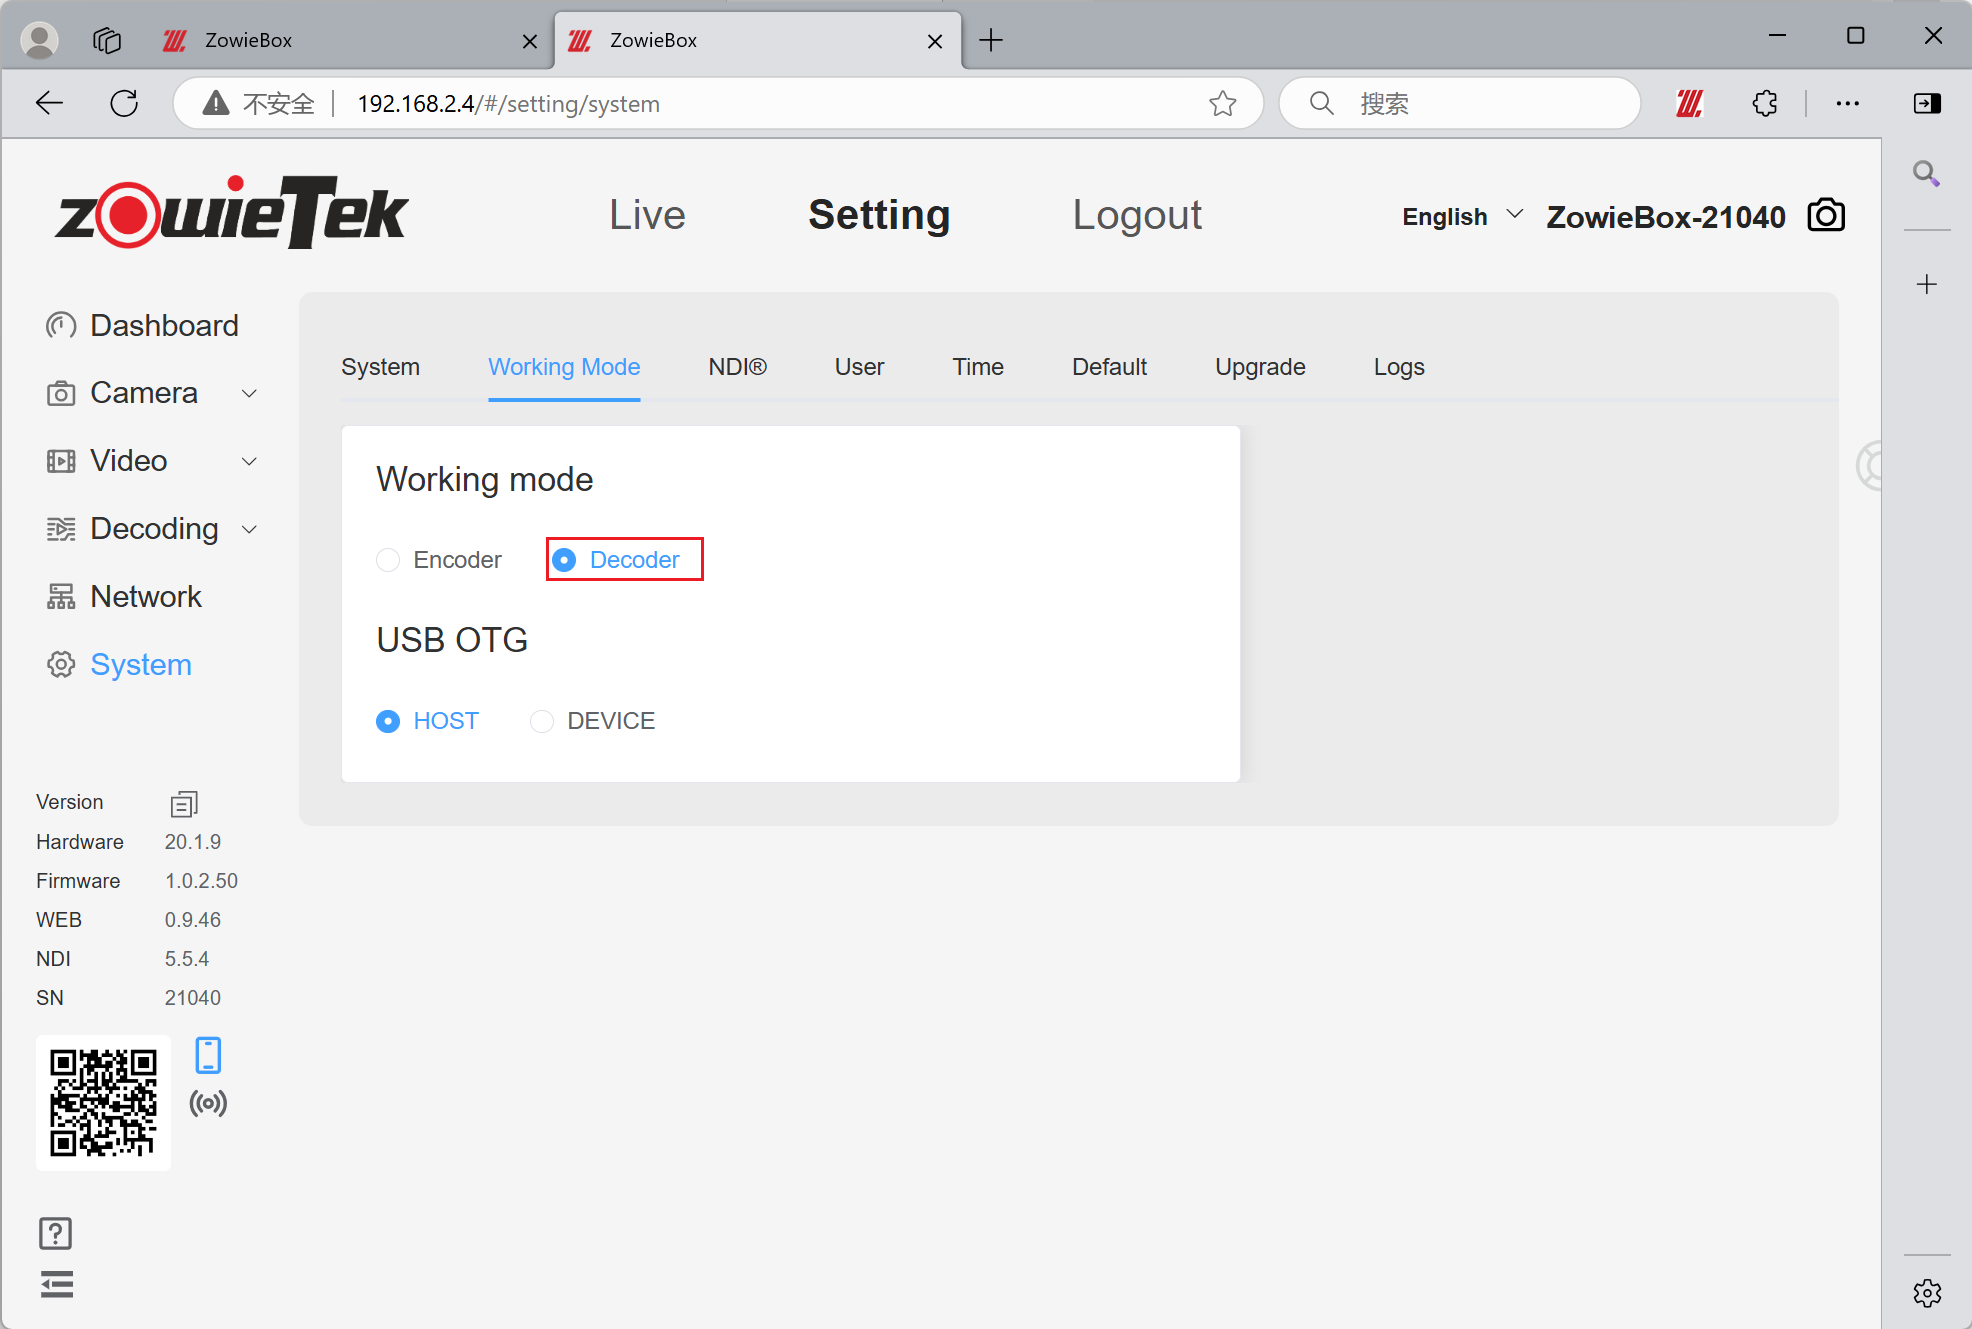
Step 9:
Click Setting->Decoding ->NDI. Click +NDI Setting. Open the NDI Discovery button below, enter your own IP in the IP address (192.168.2.5) and click Confirm.
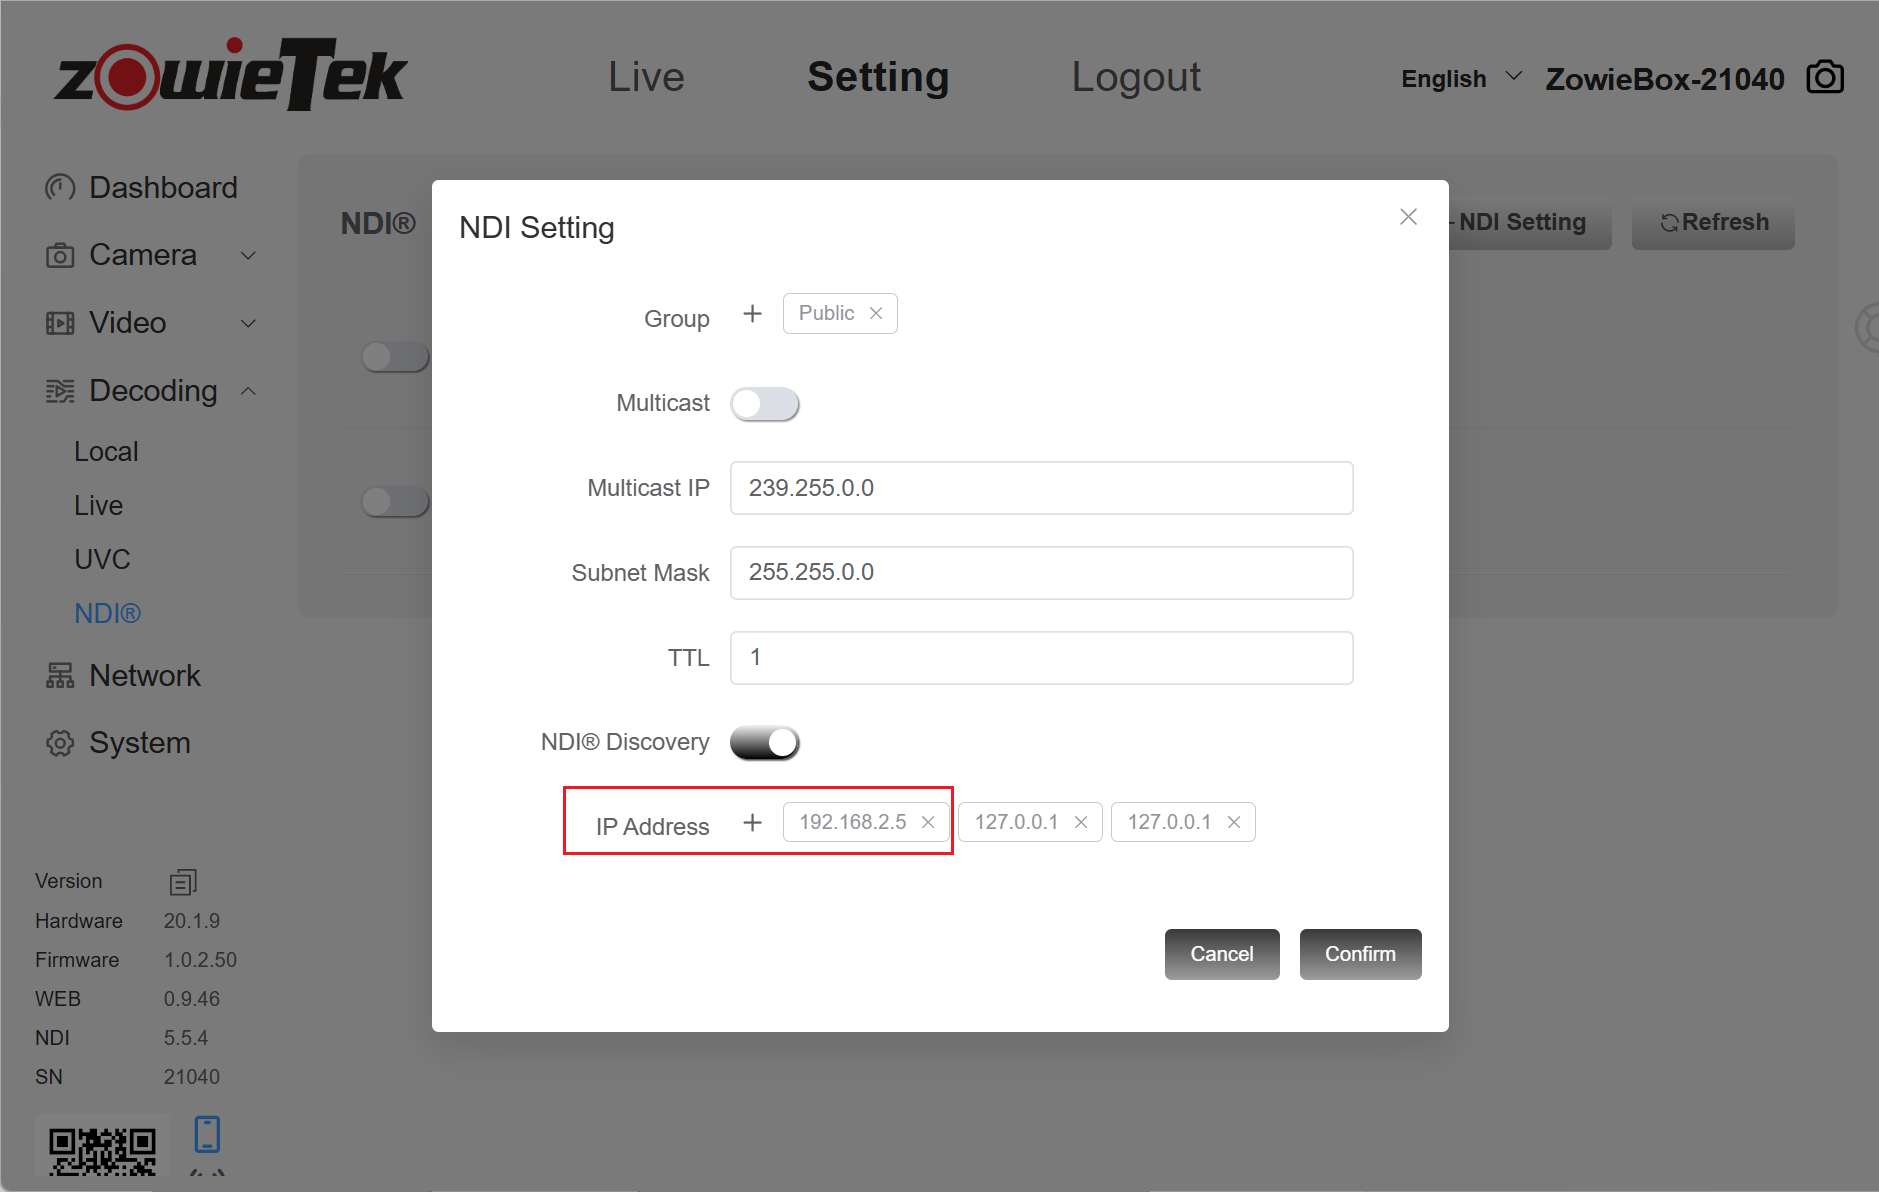
Step 10:
After the setting is successful, click the refresh button to discover the NDI of the encoding device. Click the decoding button on the left to start decoding.